博客搭建记录
博客的搭建记录
1. 参考文档
主要参考了:
文章中是使用 Netlify,本人改用的 Vercel,也不错。
2. 一些额外配置
2.1 统一添加 YAML 头部
写了一个 Python 脚本,迁移笔记的时候用的,不然每个文件都要手动添加 YAML。
脚本代码:
1
2
3
4
5
6
7
8
9
10
11
12
13
14
15
16
17
18
19
20
21
22
23
24
25
26
27
28
29
30
31
32
33
34
35
36
37
38
39
40
41
42
43
44
45
46
47
48
49
50
51
52
53
54
55
56
57
# -*- encoding: utf-8 -*-
"""
@File : addYAMLHeader.py
@Time : 2024/1/3 17:52
@Author : EndlessShw
@Email : 1502309758@qq.com
@Software: PyCharm
"""
import regex as re
import os
import argparse
def addHeader(filename, filePath):
"""
添加头部
:param filePath: 文件的绝对路径
:return:
"""
allContent = "---\n"
allContent += "title: "
allContent += re.sub(r"\.md", "", filename)
allContent += "\n"
allContent += "---\n"
f = open(filePath, encoding="utf-8")
allContent += f.read()
f.close()
with open(filePath, "w", encoding="utf-8") as writeFile:
writeFile.write(allContent)
pass
def addYAMLHeader(rootPath):
"""
为每个 md 文件头部添加 YAML 文件头
:param rootPath:
:return:
"""
for root, dirs, files in os.walk(rootPath, topdown=False):
for fileName in files:
# 为每个 markdown 文件添加 YAML 头部
if fileName.endswith(r".md"):
addHeader(fileName, os.path.join(root, fileName))
def main():
parser = argparse.ArgumentParser()
parser.description = '请输入要添加头部的文件的根路径'
parser.add_argument("-p", "--rootPath", help="根路径名", dest="rootPath", type=str, default="")
args = parser.parse_args()
rootPath = args.rootPath
if rootPath == "":
rootPath = input("请输入路径:")
addYAMLHeader(rootPath)
if __name__ == '__main__':
main()其实用的不多,因为没有添加 Tag 和 Categories。
2.2 图片格式内容转换
相关问题有的文章已经给出了,这里给我的解决方案:
对 Typora 的图片解析做了更改:

个人其实是比较喜欢./${filename}.asset的,但是所用的插件不允许(以后有 JS 基础后考虑改插件的代码),就只能这样了。
2.3 文章的时间问题
默认情况下,YAML 头没有时间头(
date)的话,应该是根据 GitHub 上文件的修改时间来的;但是如果每次git commit后,由于跨平台的换行符号问题,上传会对文件进行修改,从而导致文件的修改时间变了,所以文章的发布时间也会统一跟着变,这属实是蛋疼。先写一个添加 YAML
date头的脚本:1
2
3
4
5
6
7
8
9
10
11
12
13
14
15
16
17
18
19
20
21
22
23
24
25
26
27
28
29
30
31
32
33
34
35
36
37
38
39
40
41
42
43
44
45
46
47
48
49
50
51
52
53
54
55
56
57
58
59
60# -*- encoding: utf-8 -*-
"""
@File : update.py
@Time : 2024/4/29 15:36
@Author : EndlessShw
@Email : 1502309758@qq.com
@Software: PyCharm
"""
import regex as re
import os
import argparse
from datetime import datetime
def update(filePath):
# 打开文件
YAMLContent = ""
allContent = ""
with open(filePath, 'r', encoding="utf-8") as openFile:
allContent = openFile.read()
# 定位文件的 YAML 部分
YAMLContent = re.search(r"(?<=---).*?(?=---)", allContent, re.S).group(0)
# 获取文件的修改日期
updateTime = datetime.fromtimestamp(os.path.getmtime(filePath)).strftime("%Y-%m-%d %H:%M:%S")
# 如果不包含 date,就插入 date
if YAMLContent.find("date") == -1:
YAMLContent += "date: " + updateTime
YAMLContent += "\n"
# 如果包含 date,就修改 date 后面的内容
else:
# 获取原先文件内容中的 date
oldDate = re.search(r"(?<=date: ).*", YAMLContent).group(0)
# 如果发生了修改,则修改时间不同,那么 date 的内容就要替换
# print(oldDate[:-4])
# print(updateTime[:-4])
# 实际上 oldDate 和 updateTime 有时间误差,因此控制在 10 分钟内
if oldDate[:-4] != updateTime[:-4]:
YAMLContent = re.sub(r"(?<=date: ).*", updateTime, YAMLContent)
# 如果没有发生修改,就啥也不做
else:
pass
allContent = re.sub(r"(?<=---).*?(?=---)", YAMLContent, allContent, 1, re.S)
with open(filePath, 'w', encoding="utf-8") as writeFile:
writeFile.write(allContent)
pass
def main():
parser = argparse.ArgumentParser()
parser.description = '请输入待更新的文件的根路径'
parser.add_argument("-p", "--rootPath", help="根路径名", dest="rootPath", type=str, default="")
args = parser.parse_args()
rootPath = args.rootPath
if rootPath == "":
rootPath = input("请输入路径:")
update(rootPath)
if __name__ == '__main__':
main()每次写完/修改完文章后,调用脚本,输入路径后即可自动添加
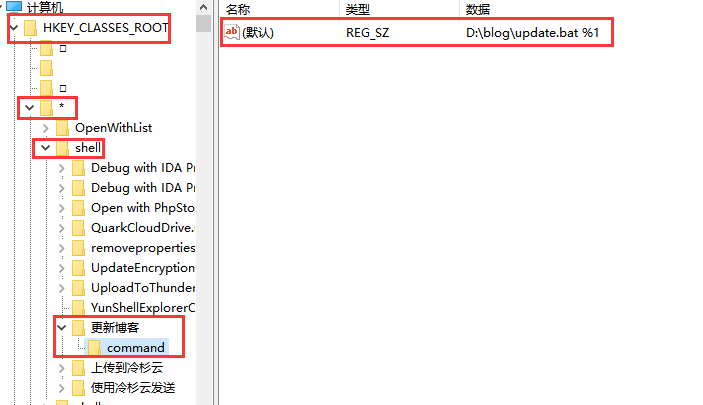
date头。但还是不方便,每次都要敲命令和输入文件路径。因此考虑自动化,最简单的方法就是把调用脚本的操作用一个右键来直接整合。先写一个 bat 文件:
1
2
python D:\blog\update.py -p "%1"
# %1 是占位符,最终的内容就是文件的绝对路径然后添加文件的右键功能,这里要修改注册表,教程网上也有:

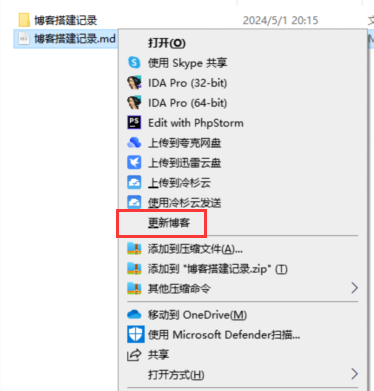
最终就是:

这样一个右键一个左键就可以将文件的时间进行同步。(TODO:感觉还可以搞个快捷键)
3. 日常发表文章 - 自用
- 指令:
1
2
3
4
cd "博客目录"
git add .
git commit -m "xxx"
git push origin main(主分支的名字)
博客搭建记录
https://endlessshw.top/Blog/博客搭建记录/